> ## Documentation Index
> Fetch the complete documentation index at: https://docs.flashcat.cloud/llms.txt
> Use this file to discover all available pages before exploring further.
# WeCom
> By integrating a WeCom third-party app, you can receive and respond to alerts within WeCom
**Plan requirement**: IM integration requires an On-call Pro or higher subscription. [Learn more](https://flashcat.cloud/flashduty/price/)
This documentation supports [Third-Party App Integration](#third-party) or [Custom App Integration](#self) methods.
**Third-Party App Integration** and **Custom App Integration** only need to configure one method as needed.
## 1. Third-Party App Integration
As a WeCom service provider, Flashduty provides a long-term free version of the Flashduty app. This app requires WeCom API call authorization to use (passwordless login + message sending). This authorization currently supports **up to 60 days** free; beyond this usage period, Flashduty needs to purchase WeCom licenses for you before you can continue using it.
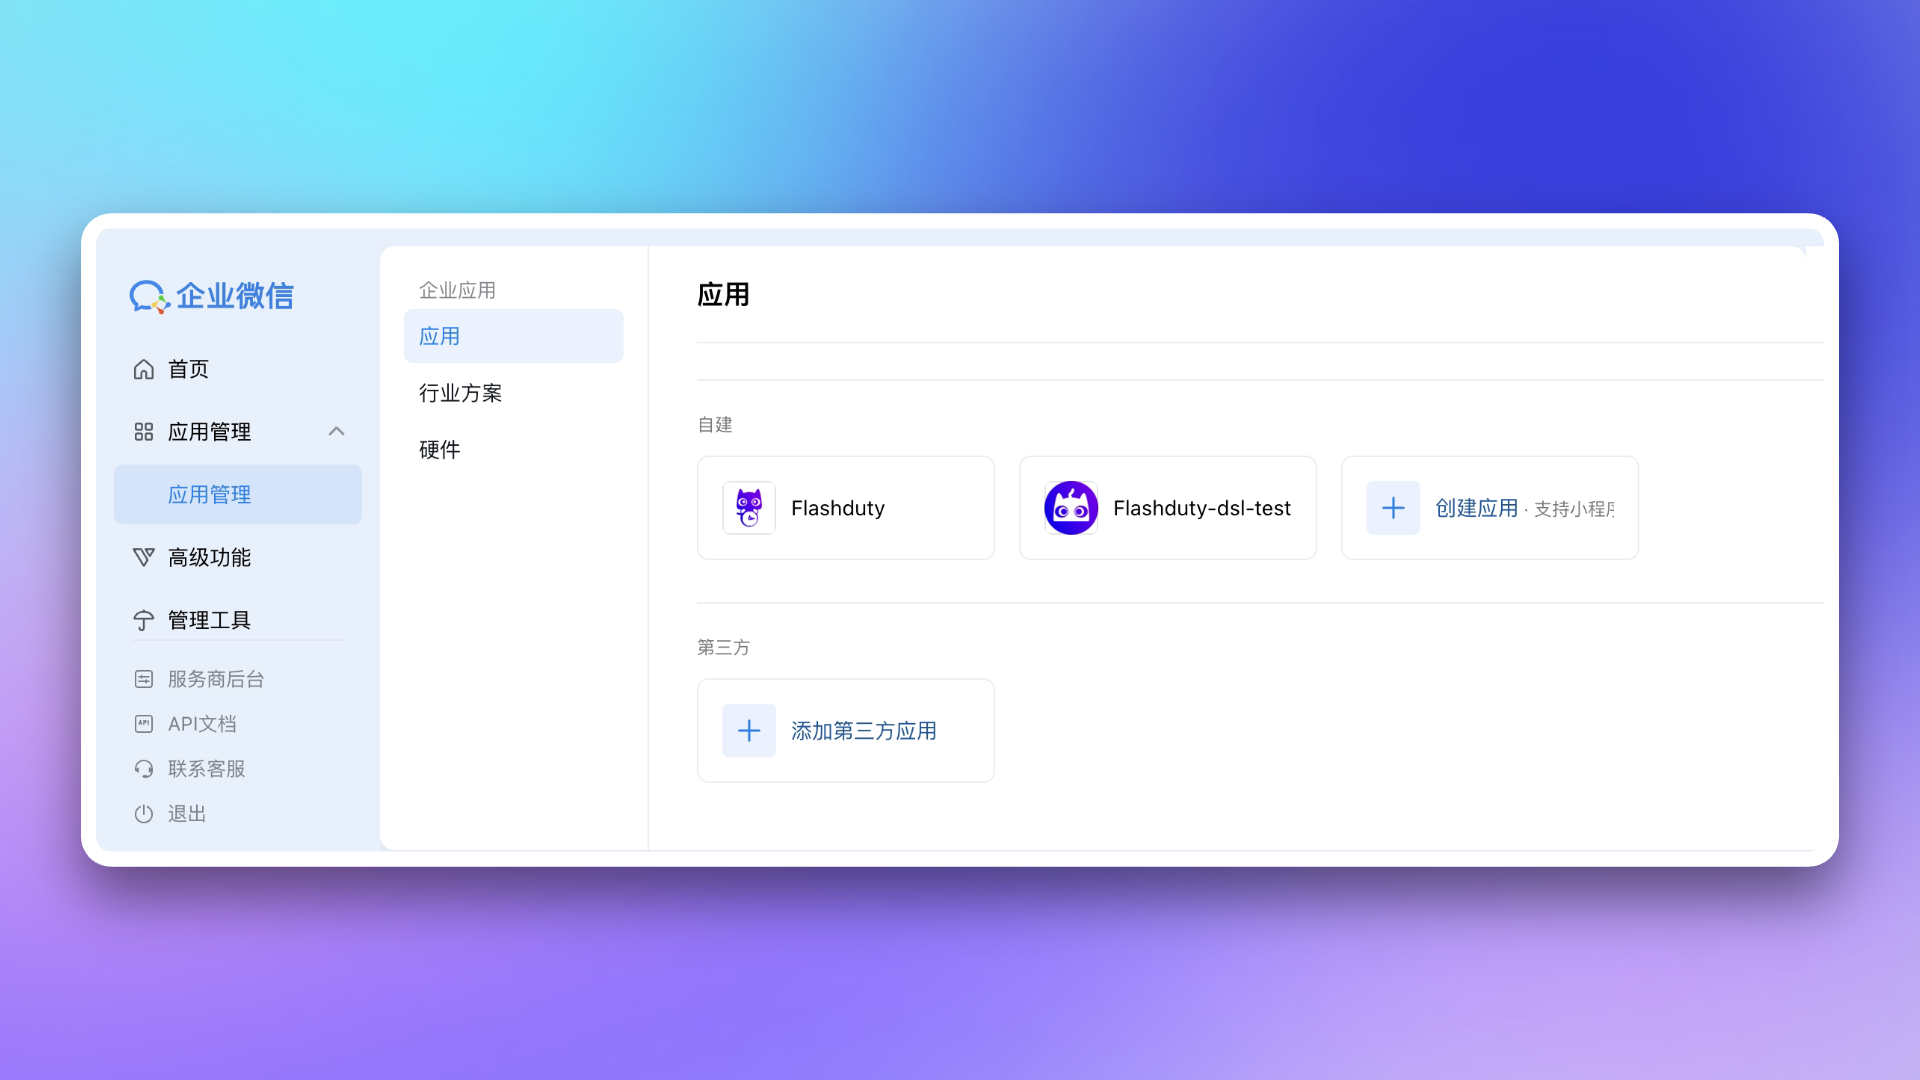
1. Visit [WeCom Admin Console](https://work.weixin.qq.com/wework_admin/frame#apps), go to App Management → **Apps** page, click **Add Third-Party App**.
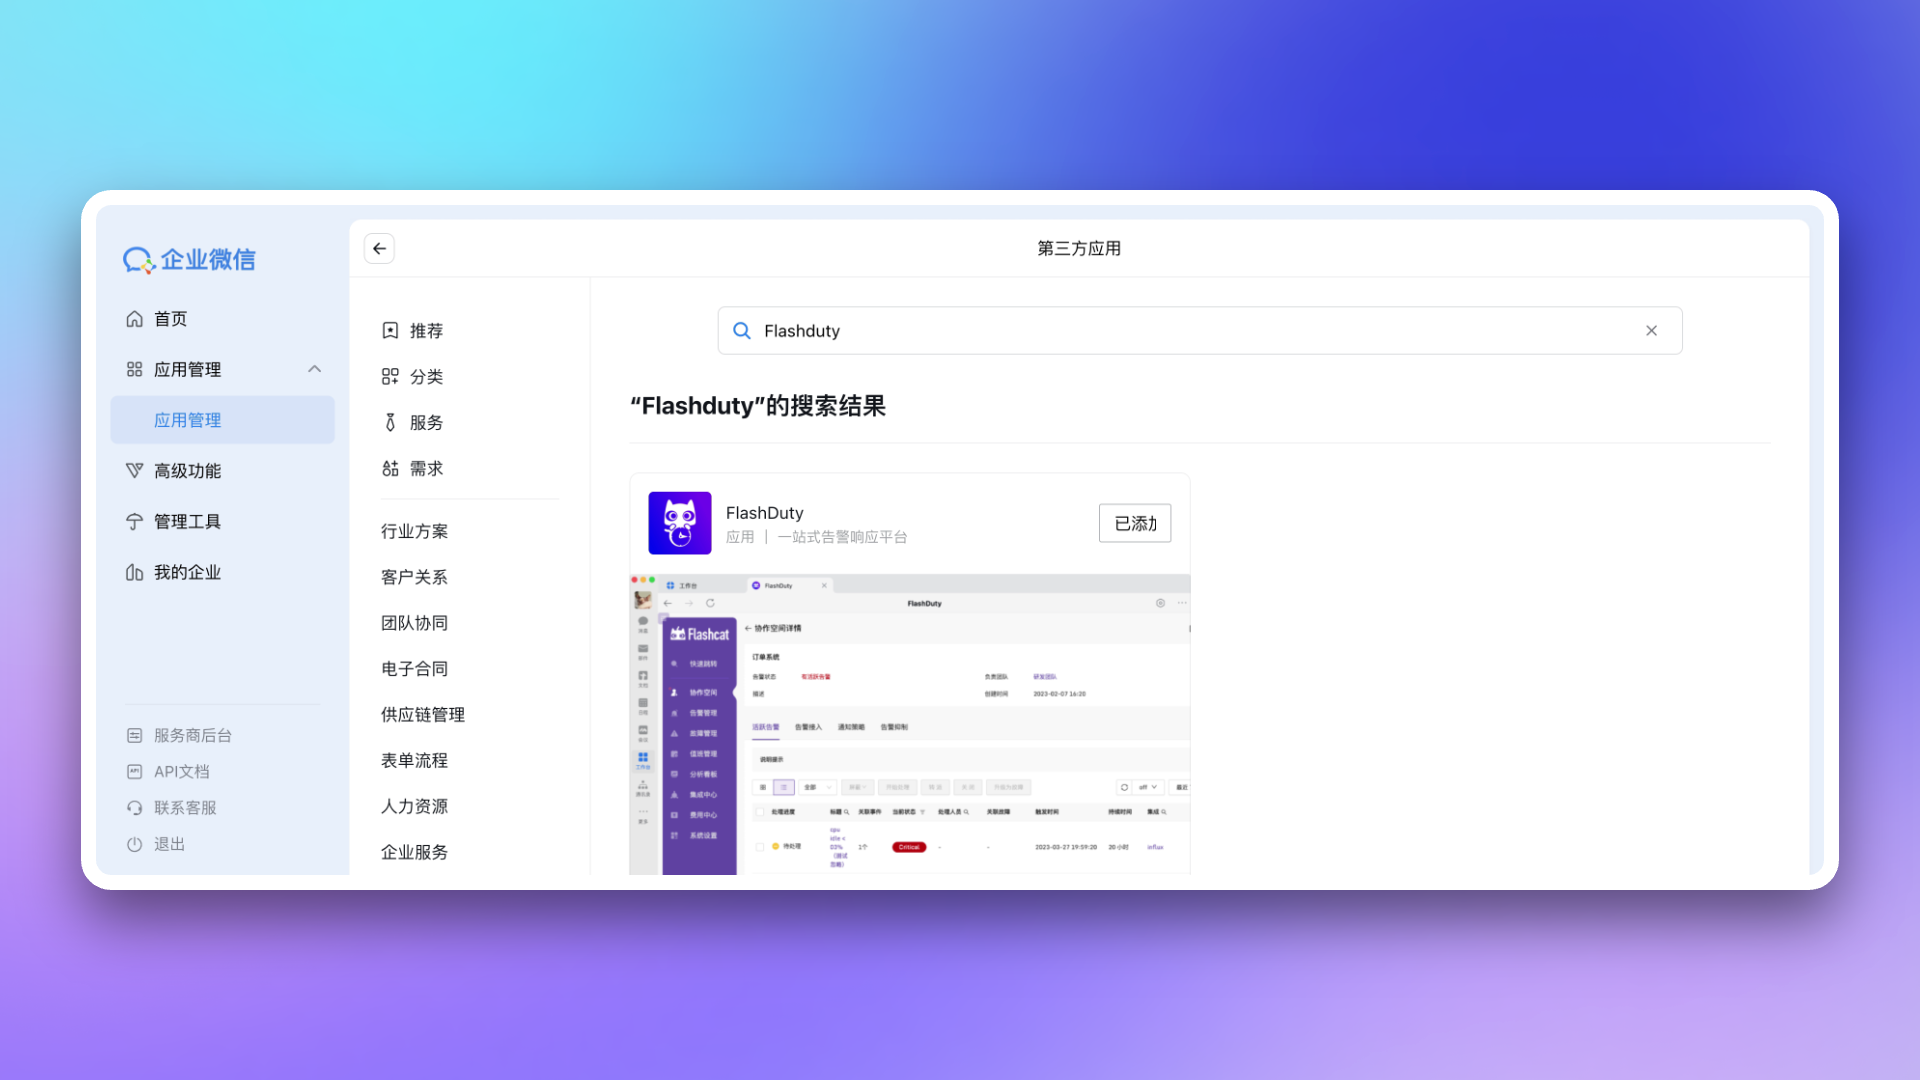
2. Enter `Flashduty` in the search bar, after finding the app, click **Add**.
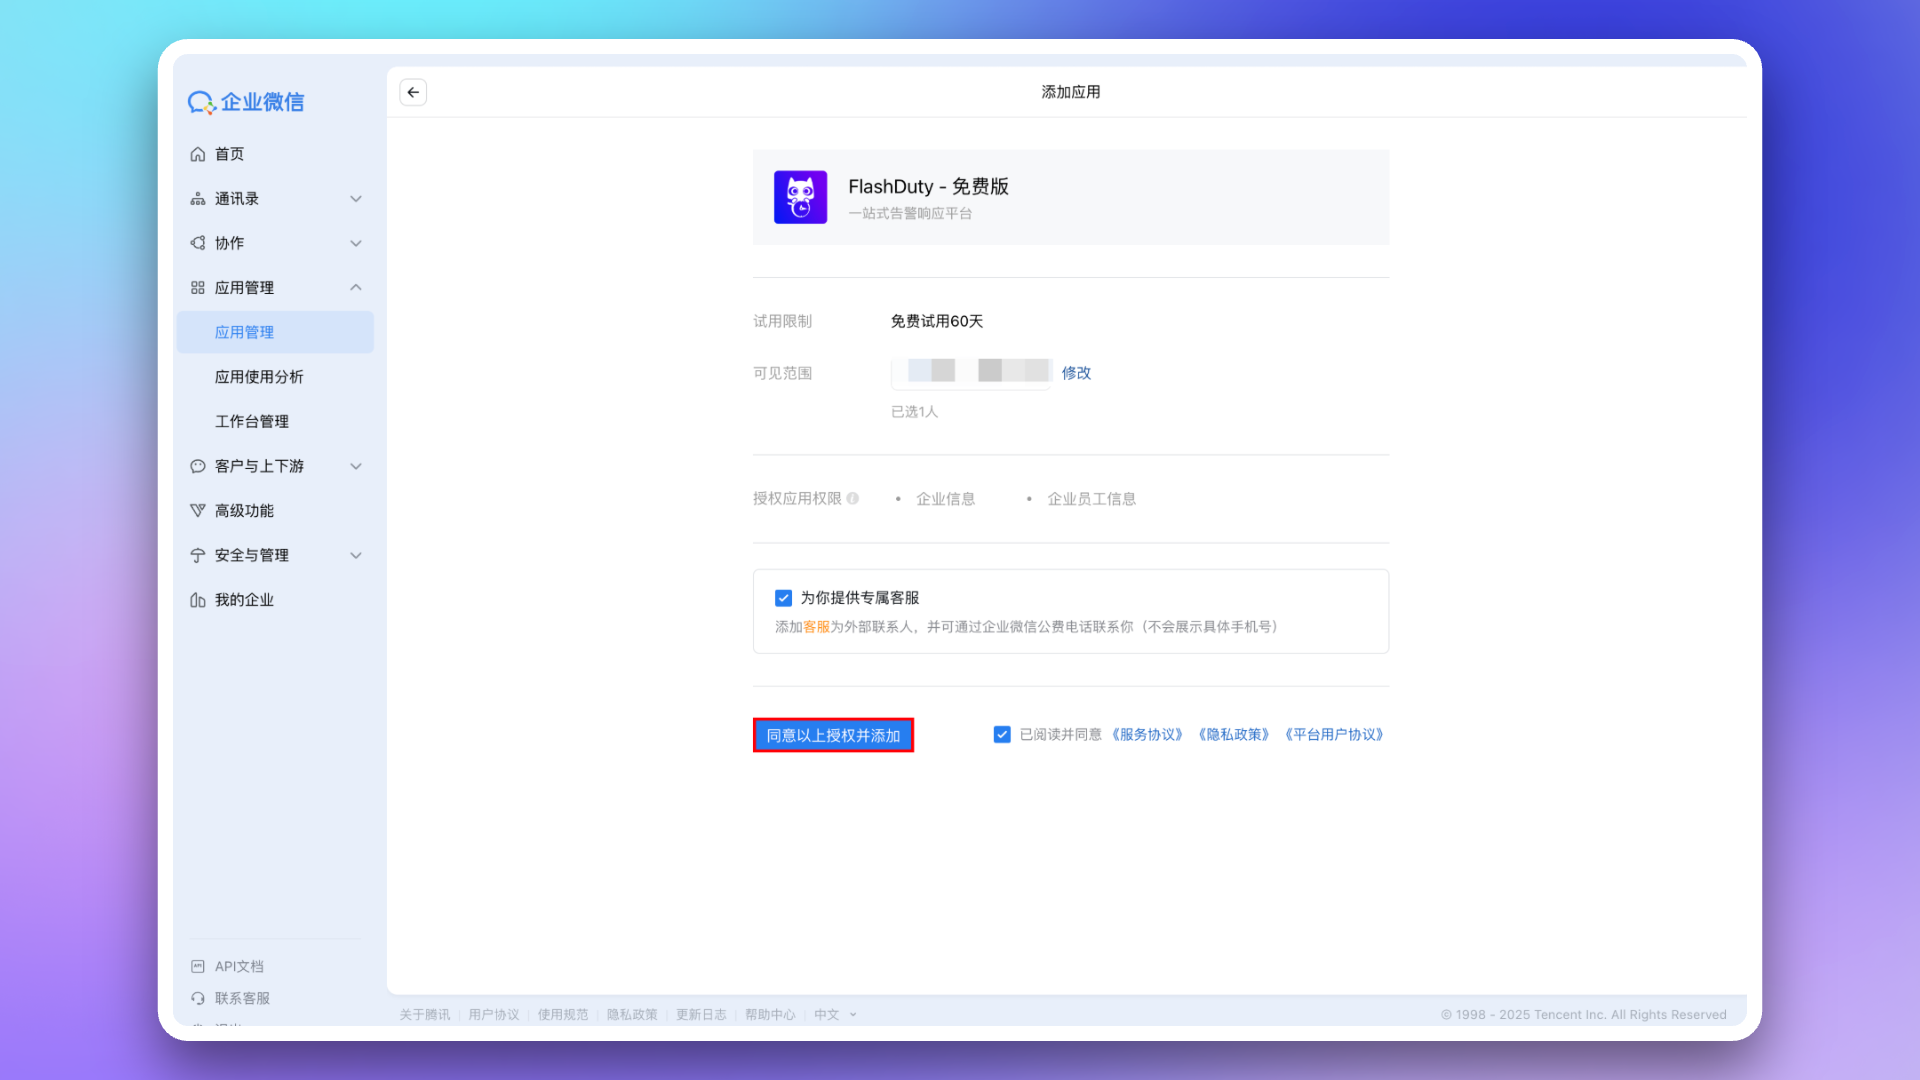
3. Modify app **Visibility**, recommend selecting all employees or specific department nodes to avoid modifying when new enterprise members join. Then click **Agree to the above authorization and add** to complete installation.
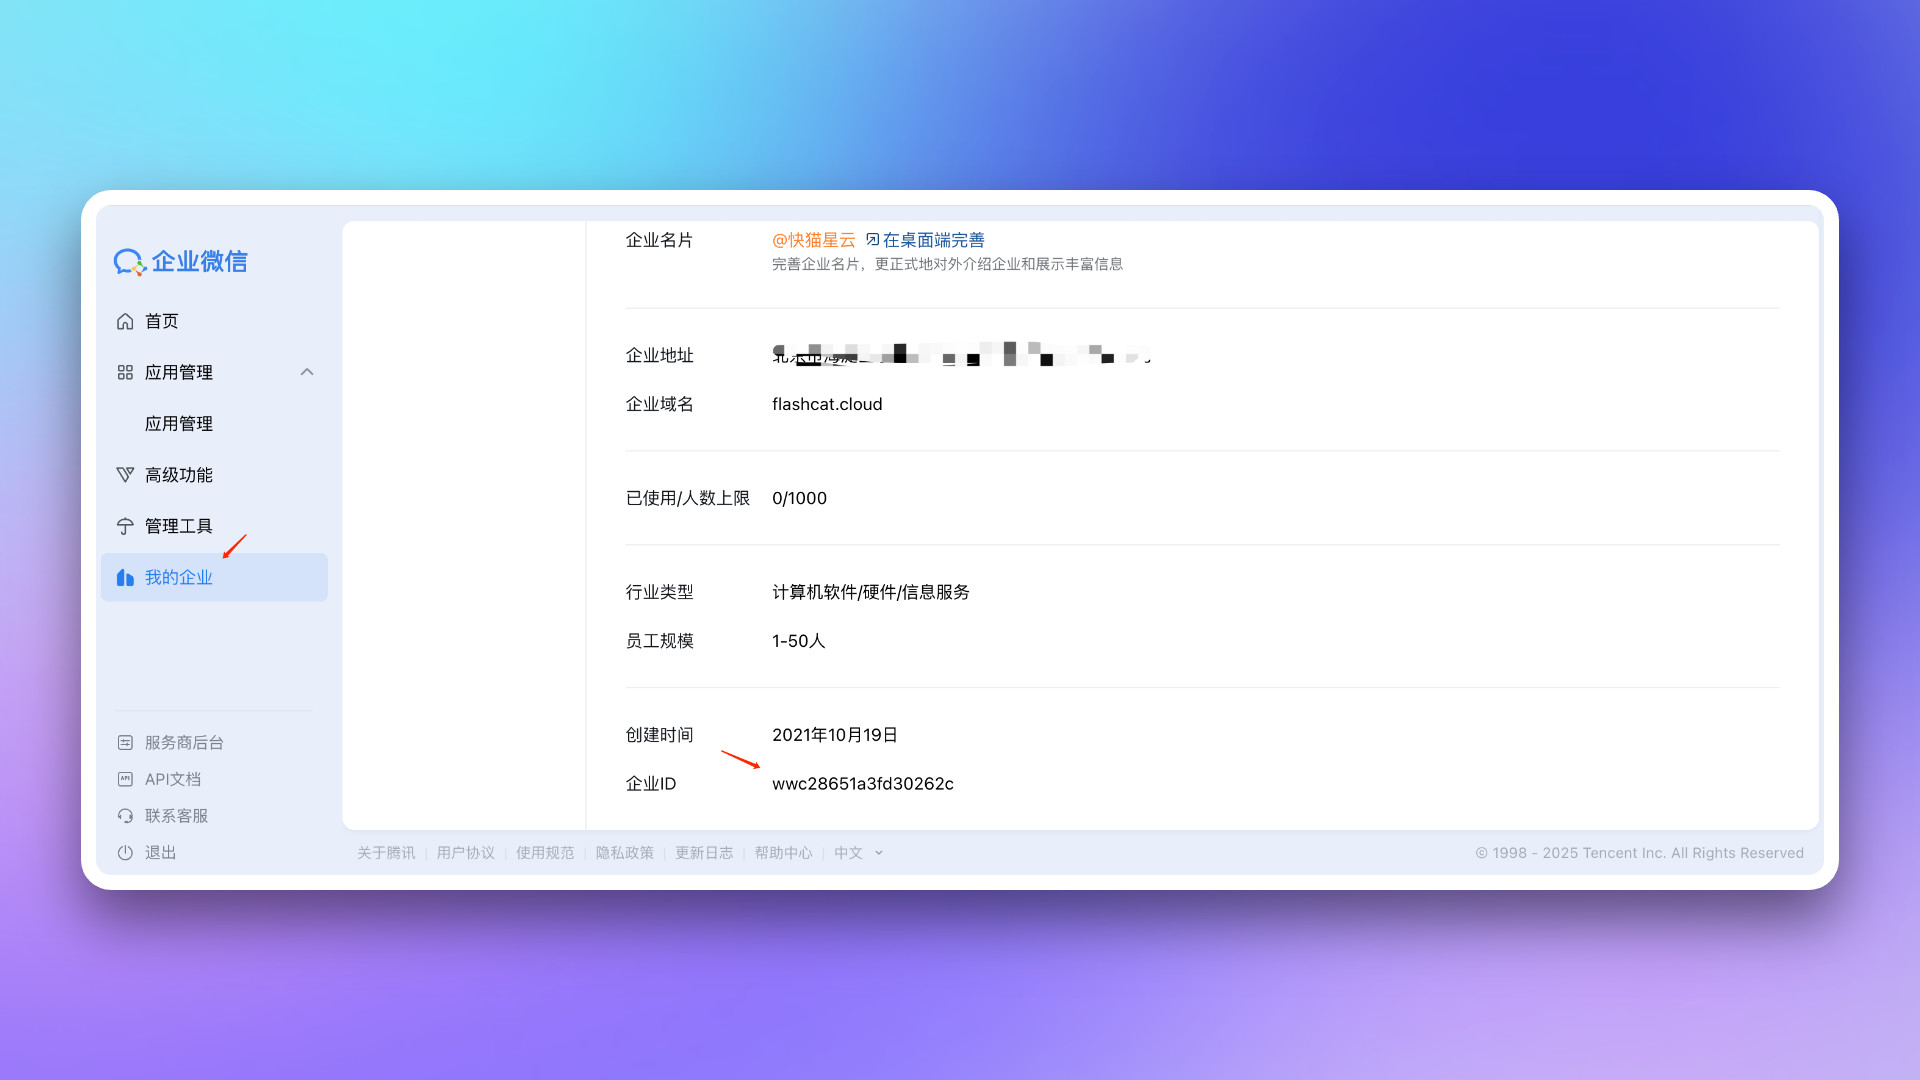
4. Visit [WeCom Admin Console](https://work.weixin.qq.com/wework_admin/frame#apps), go to **My Enterprise** page, get `Corp ID`.
5. Return to Flashduty On-call integration configuration page, fill in the `Corp ID` obtained in the previous step, click **Save** to complete integration.
## 2. Custom App Integration
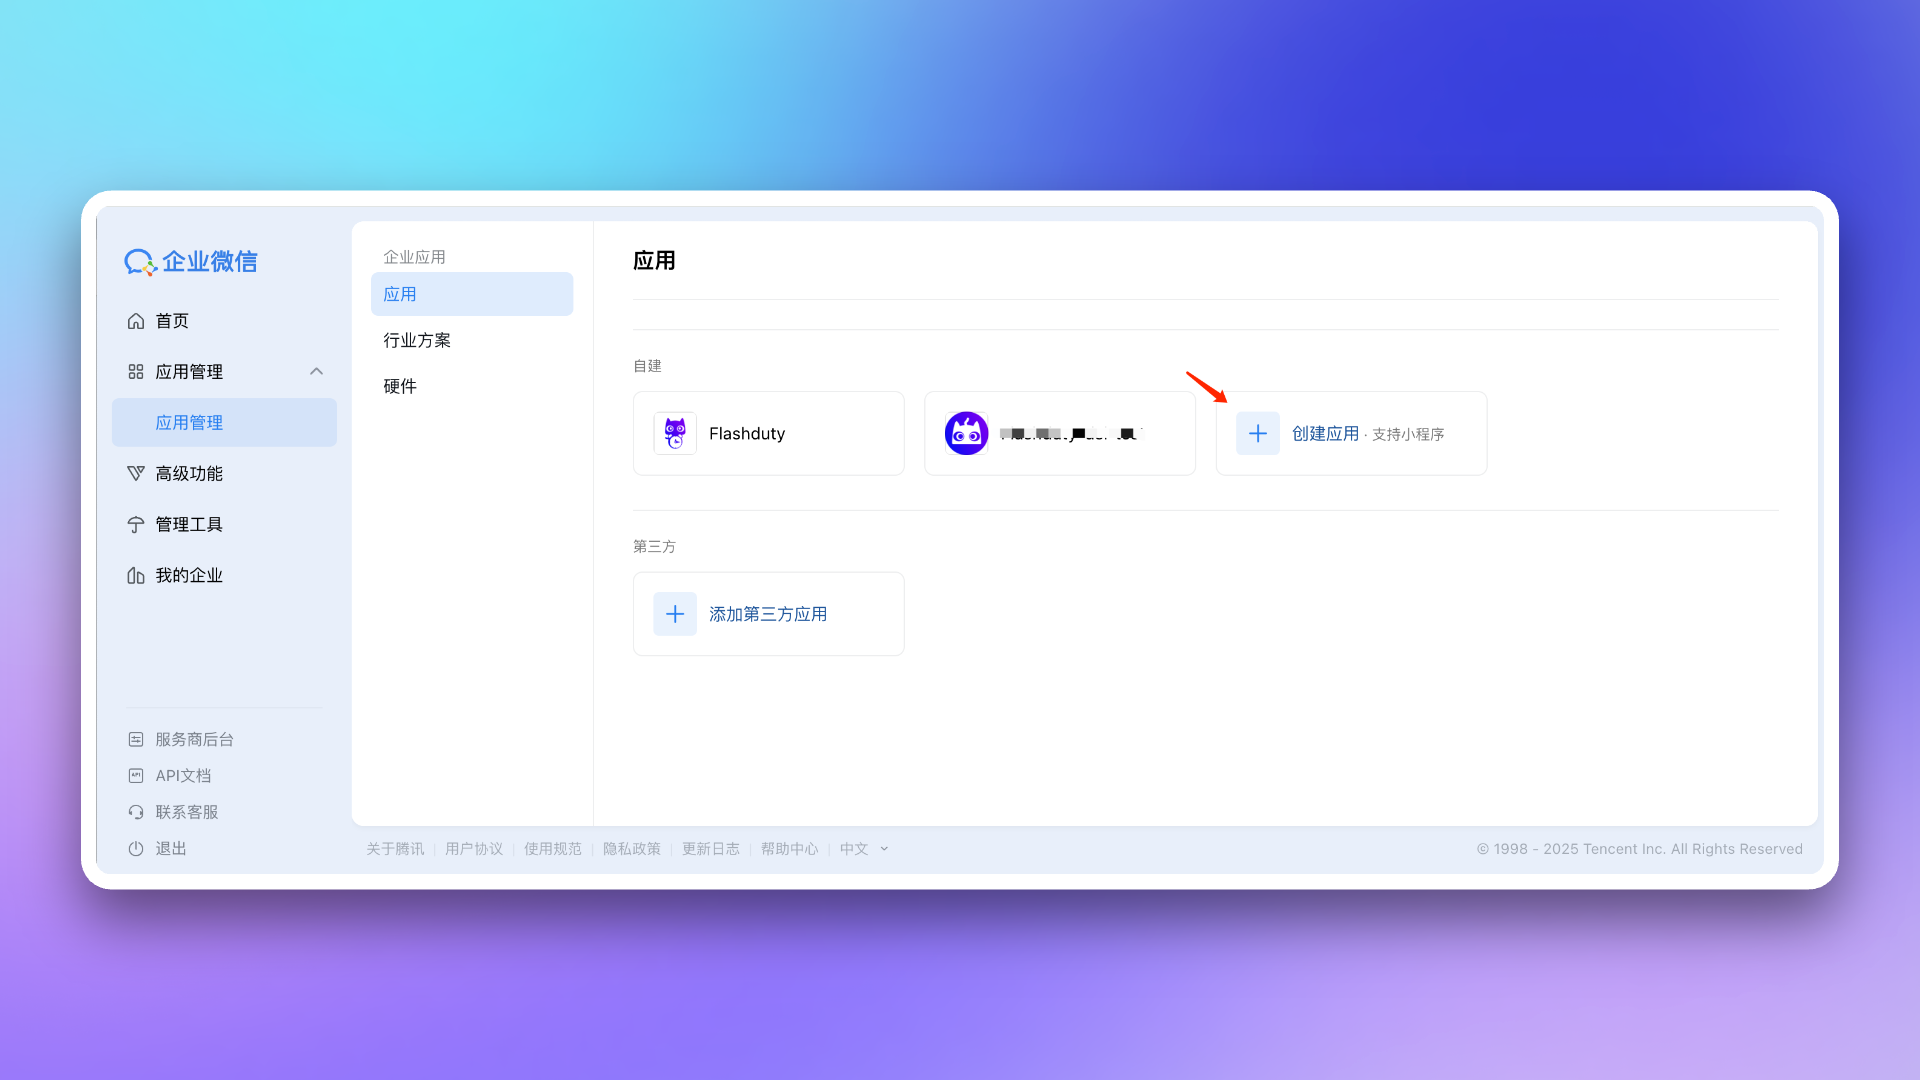
1. Visit [WeCom Admin Console](https://work.weixin.qq.com/wework_admin/frame#apps), go to App Management → **Apps** page, click **Create App**.
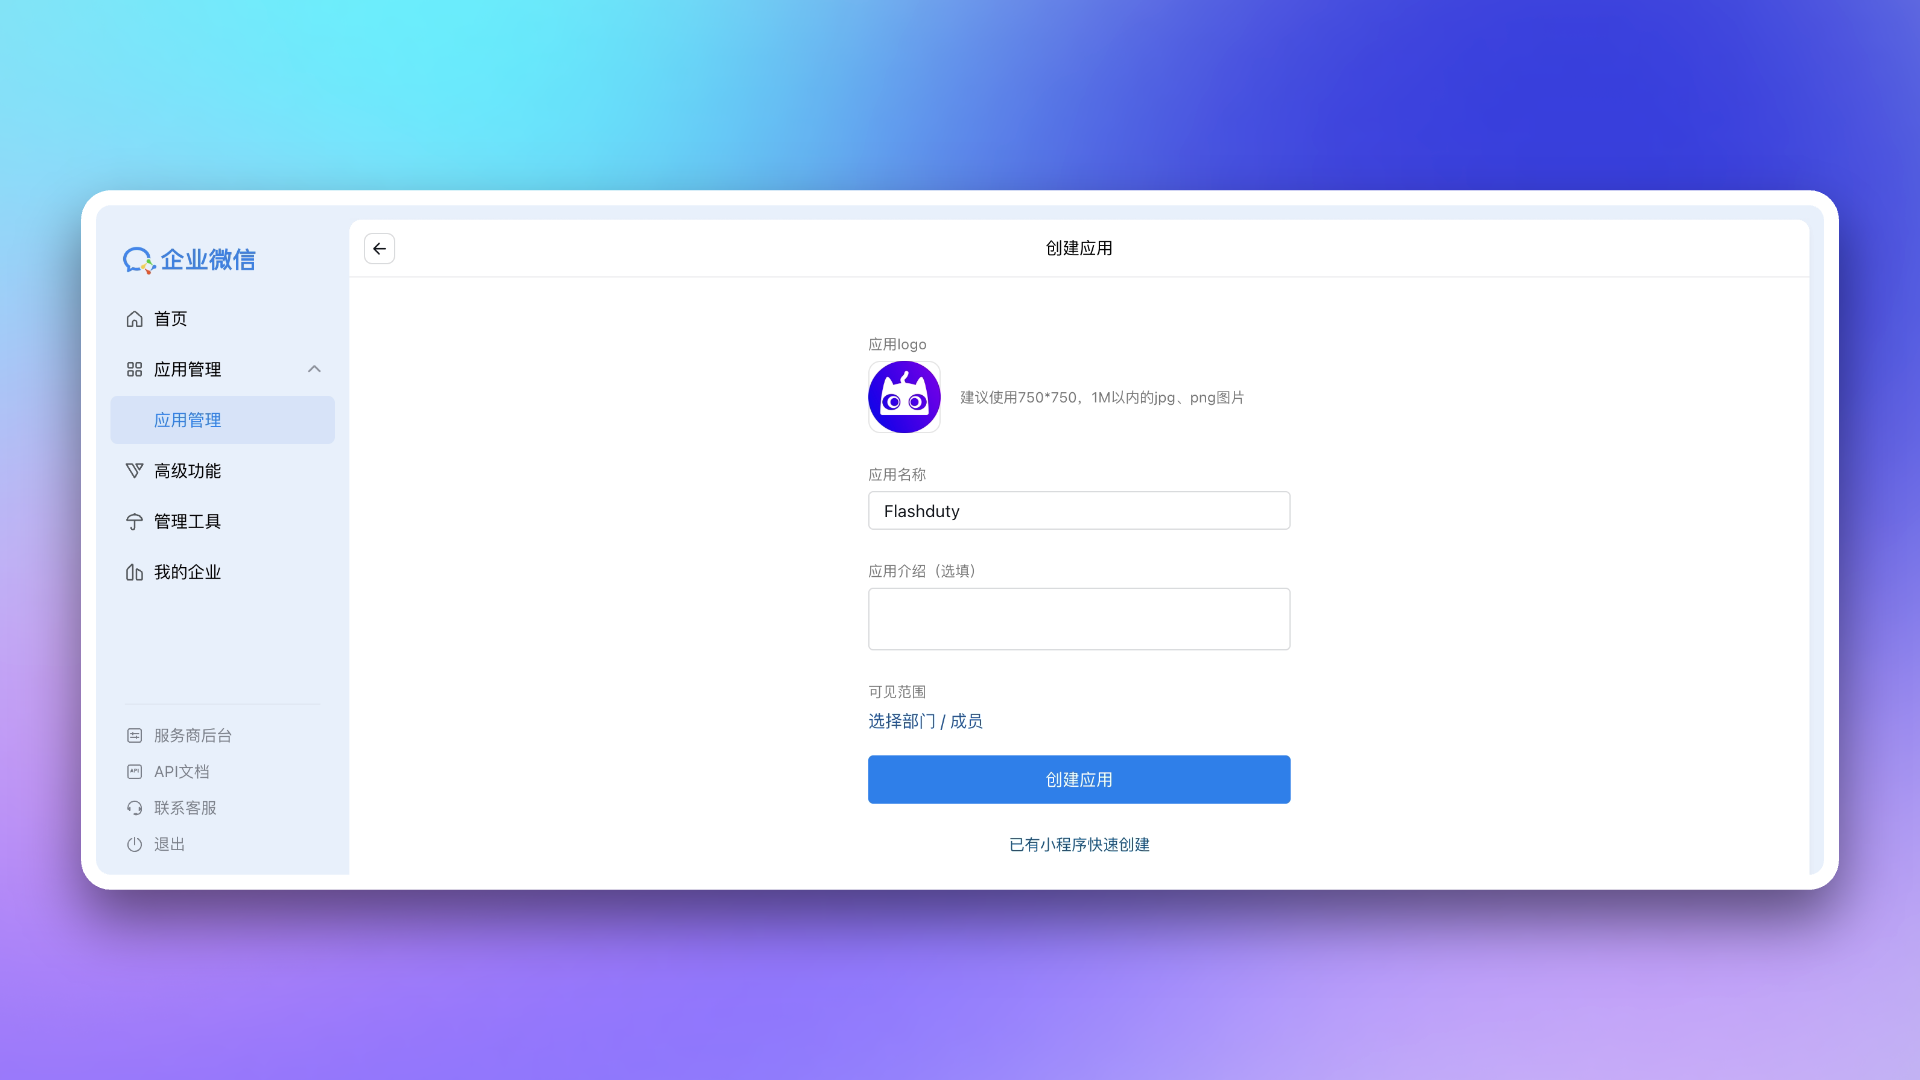
2. Configure **App Logo**, **App Name**, and **App Visibility**.
3. Return to Flashduty On-call integration configuration page, select whether your WeCom is `Non-private deployment version` based on your actual situation.
If your WeCom is a private deployment version, you need to fill in `Endpoint` in the configuration page. This address needs to be accessible by Flashduty services—you may consider setting up **whitelist authorization** for it.
4. Visit [WeCom Admin Console](https://work.weixin.qq.com/wework_admin/frame#apps), go to **My Enterprise** page, get `Corp ID`, and fill it in the Flashduty On-call integration configuration page.
5. Return to [WeCom Admin Console](https://work.weixin.qq.com/wework_admin/frame#apps), go to **App Management** page, click the app you created to enter details page. Get `AgentId` from the page and fill it in the Flashduty On-call integration configuration page.
6. On the app details page, get `Secret` and fill it in the Flashduty On-call integration configuration page.
7. On the app details page, go to **Web Authorization & JS-SDK** page, click **Set Trusted Domain**, and configure as required.
The trusted domain needs to point to Flashduty On-call's backend address `{api_host}` (achievable via CNAME or proxy forwarding). For trusted domain requirements, see WeCom official documentation [Enterprise Internal Development Domain Configuration Guide](https://open.work.weixin.qq.com/wwopen/common/readDocument/40754).
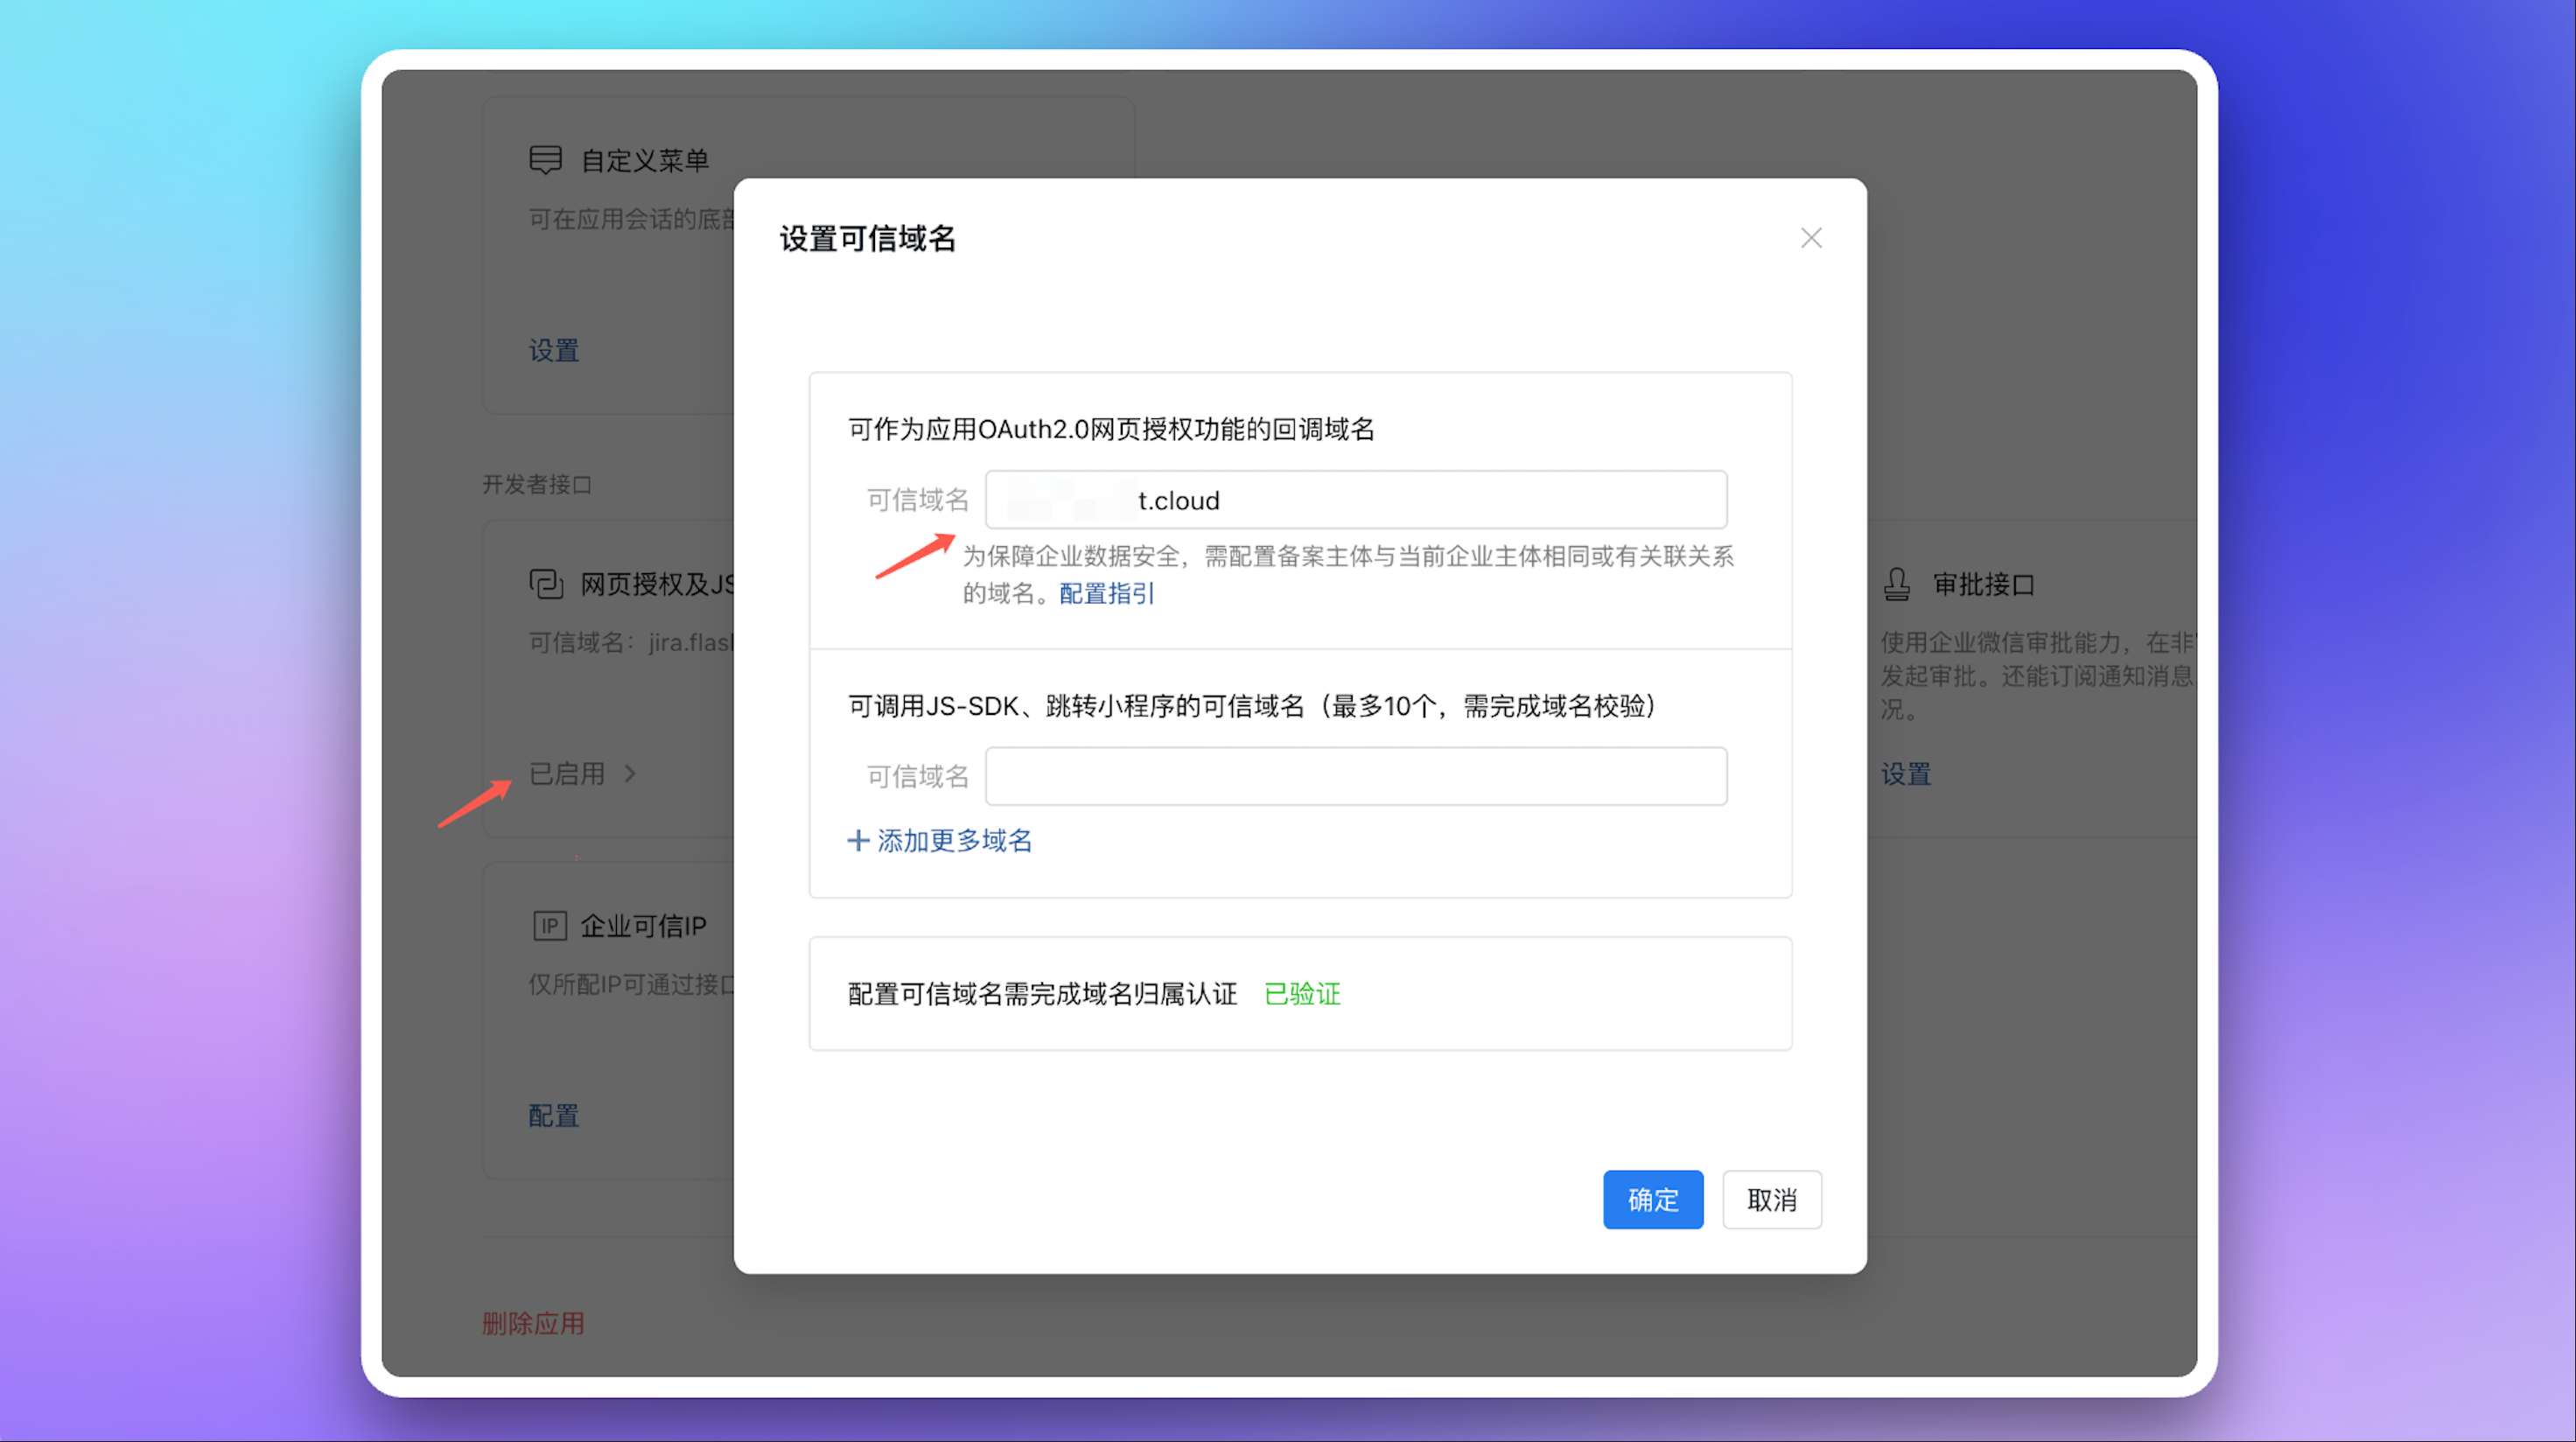
Return to Flashduty On-call integration configuration page, fill in this domain and complete verification.
8. On the app details page, go to **Receive Messages** page, and **Set API Receive**. Click **Random Generate** for `Token` and `EncodingAESKey` respectively, then copy and save the generated values.
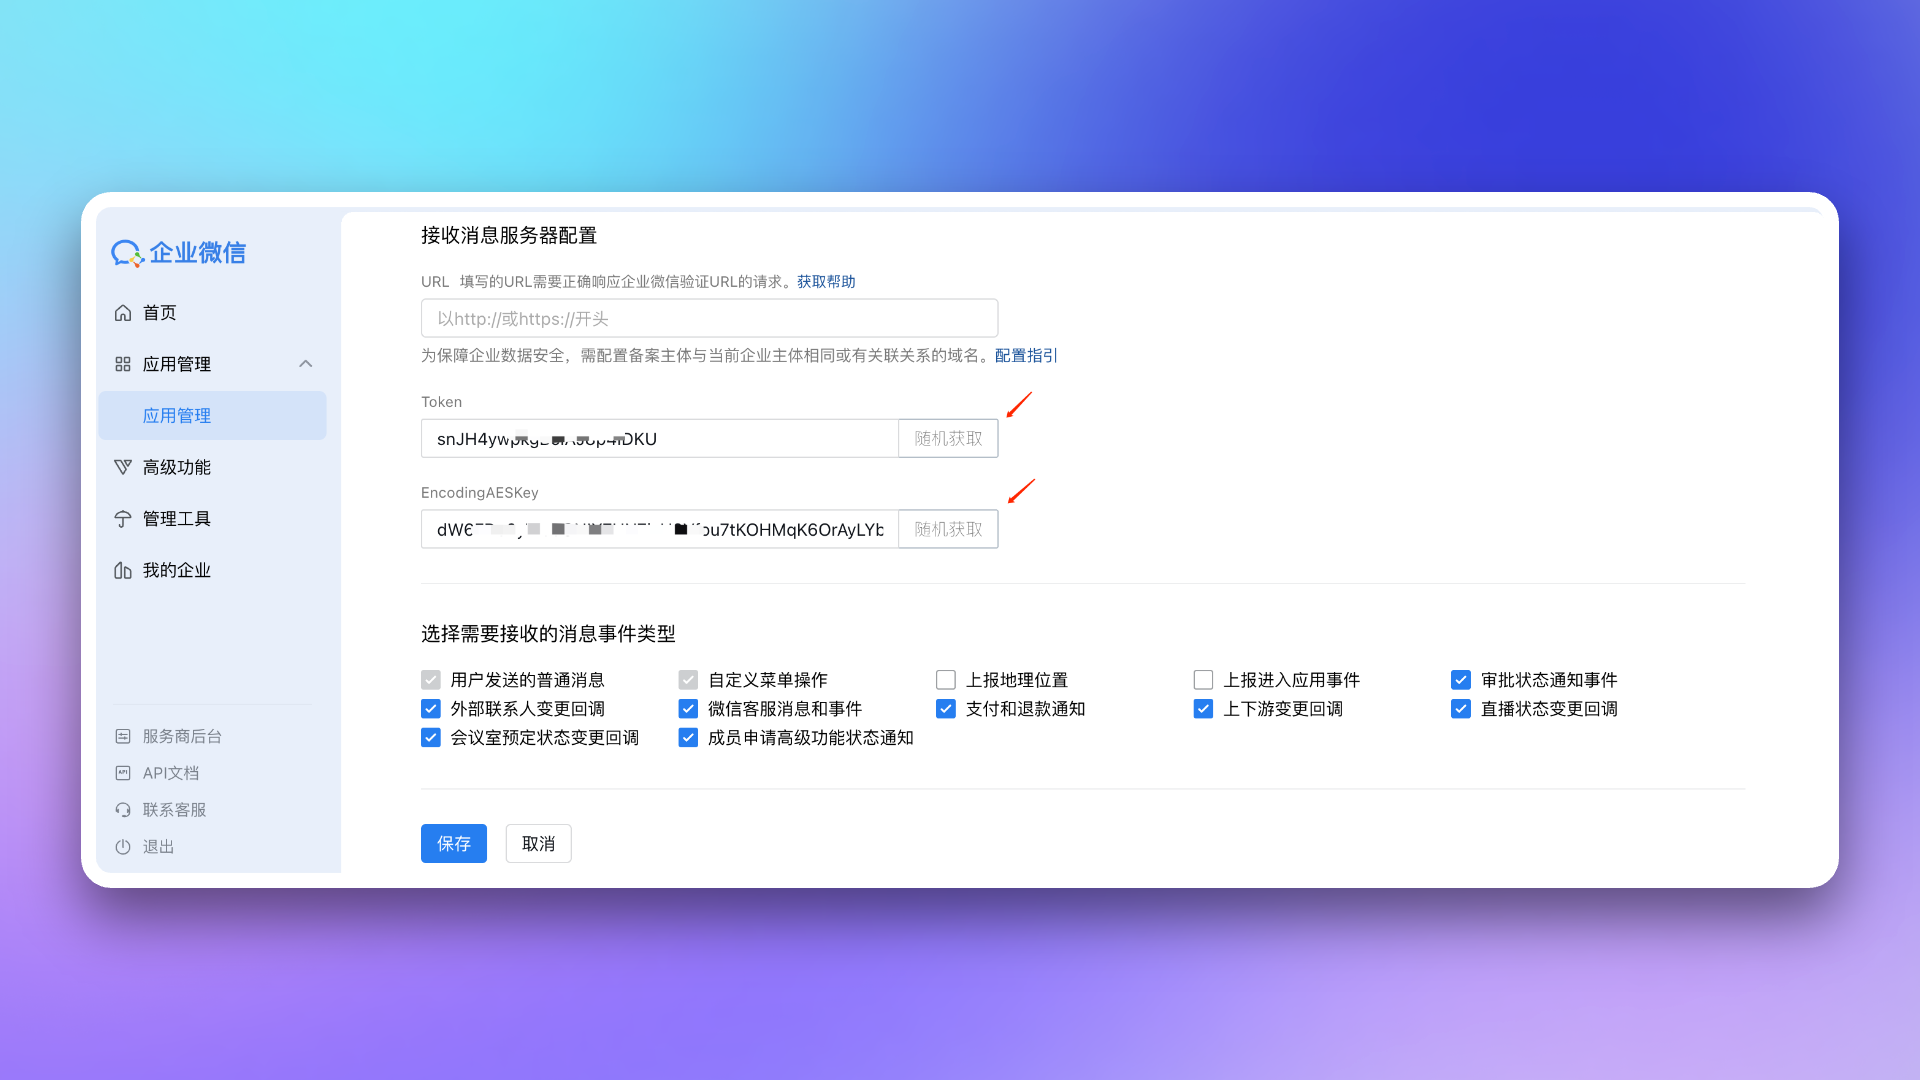
Return to Flashduty On-call integration configuration page, fill in the saved `Token` and `EncodingAESKey`, click **Save** to complete integration.
9. Copy the `Callback URL` from Flashduty On-call integration details page, return to WeCom's **Receive Messages** page. In **API Receive** settings, fill in this `Callback URL` and the `Token` and `EncodingAESKey` saved in the previous step, then click **Save**.
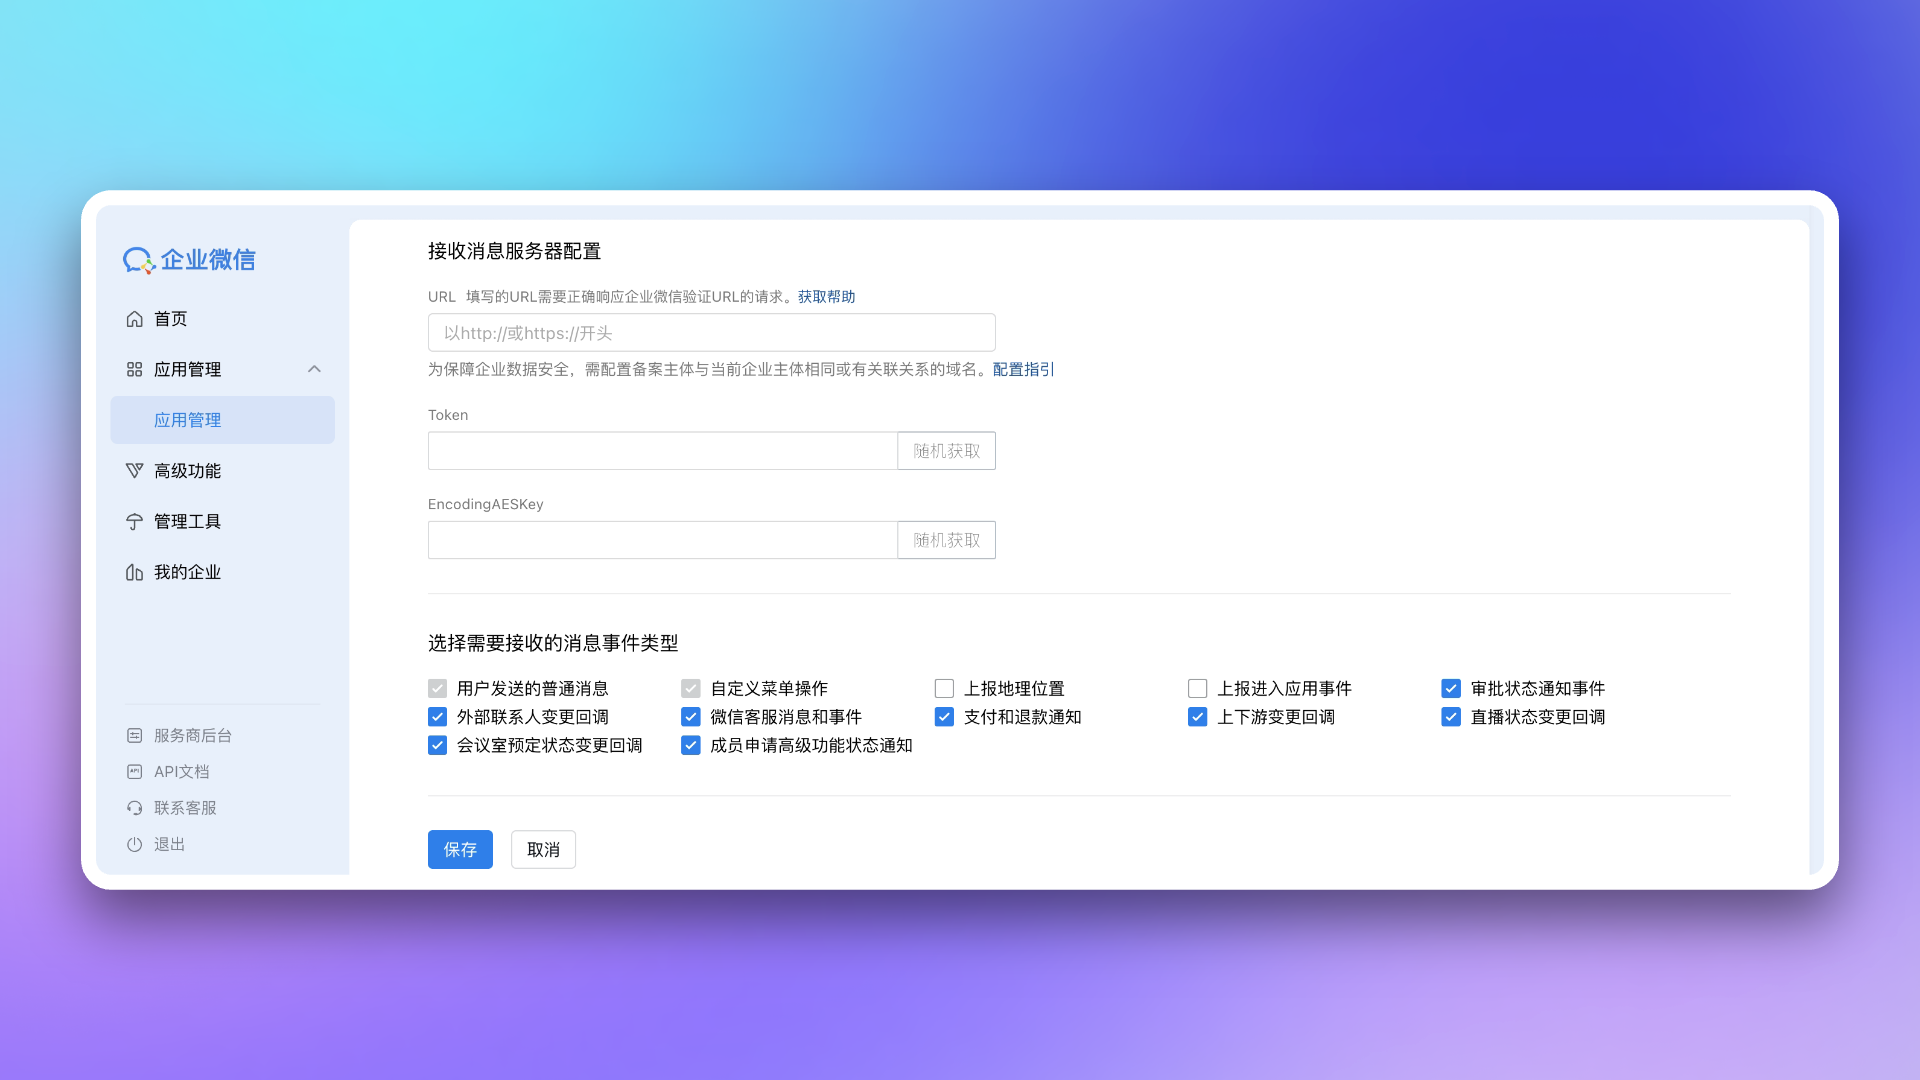
10. Configure **Frontend Trusted Domain**
The trusted domain needs to point to Flashduty On-call's frontend address `console.flashcat.cloud` (achievable via CNAME or proxy forwarding). For trusted domain requirements, see WeCom official documentation [Enterprise Internal Development Domain Configuration Guide](https://open.work.weixin.qq.com/wwopen/common/readDocument/40754).
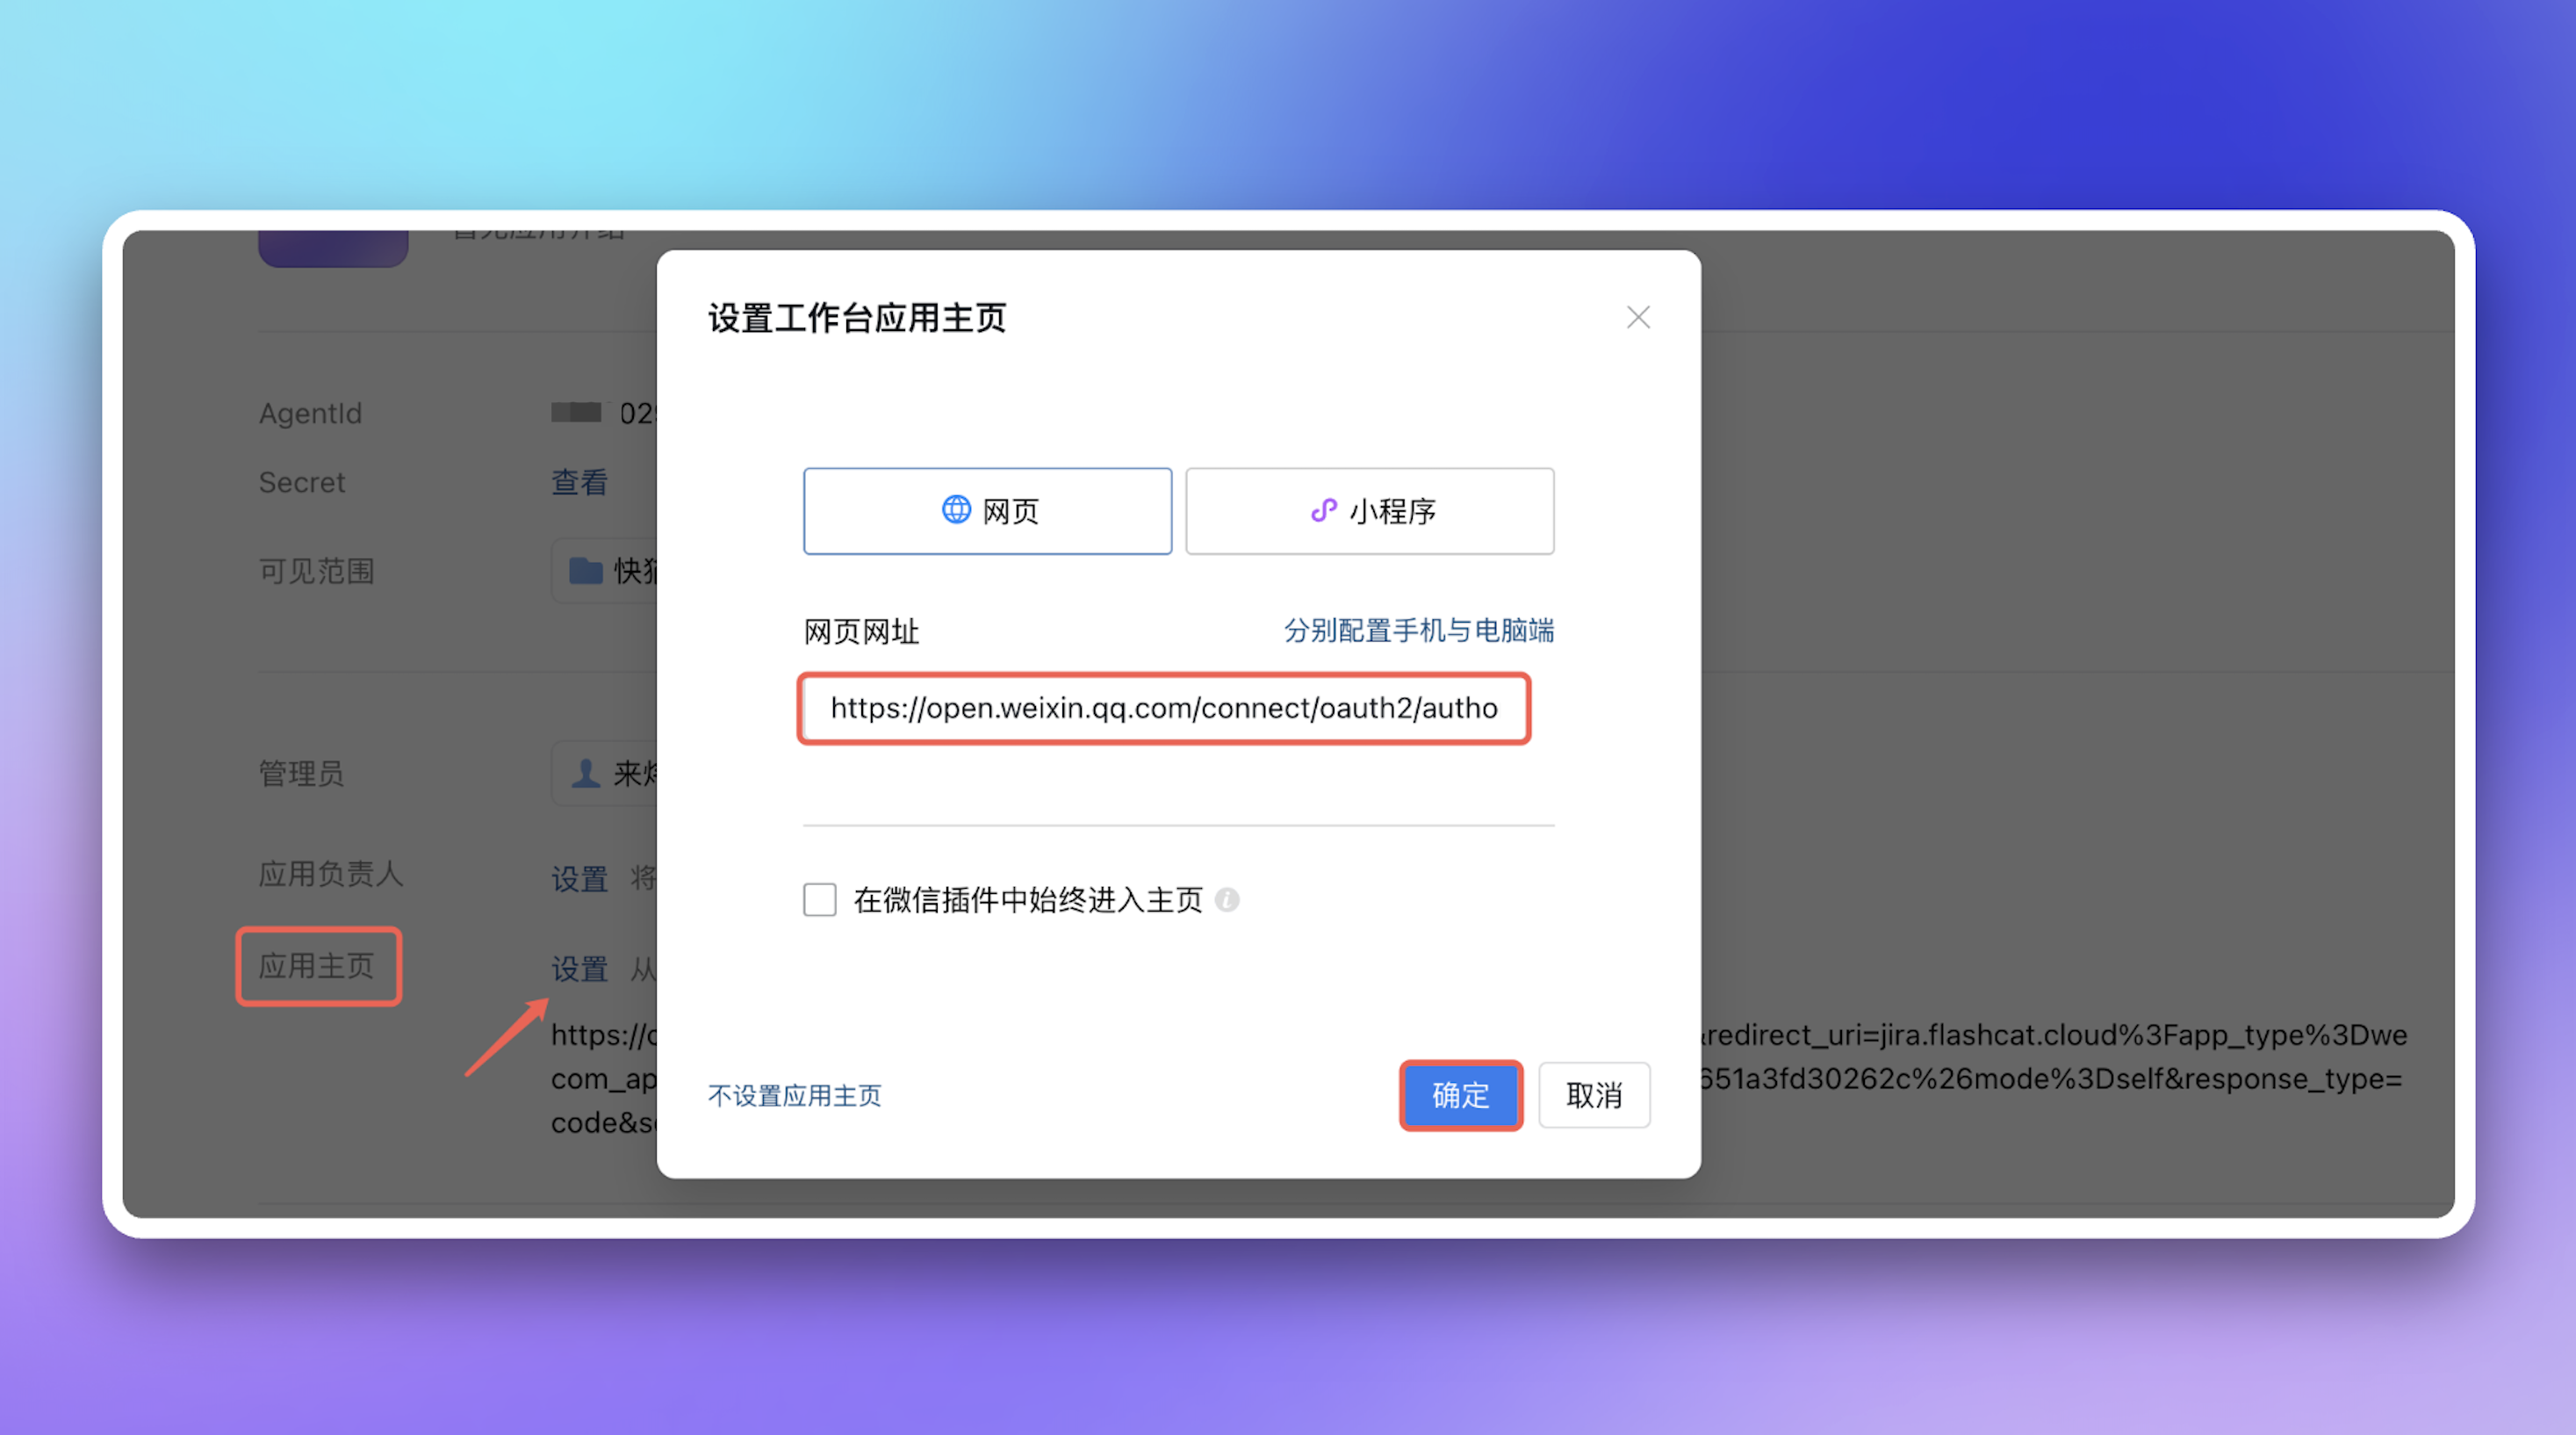
After frontend trusted domain verification passes, configure the generated **Homepage URL** to the WeCom app's **Workspace App Homepage**
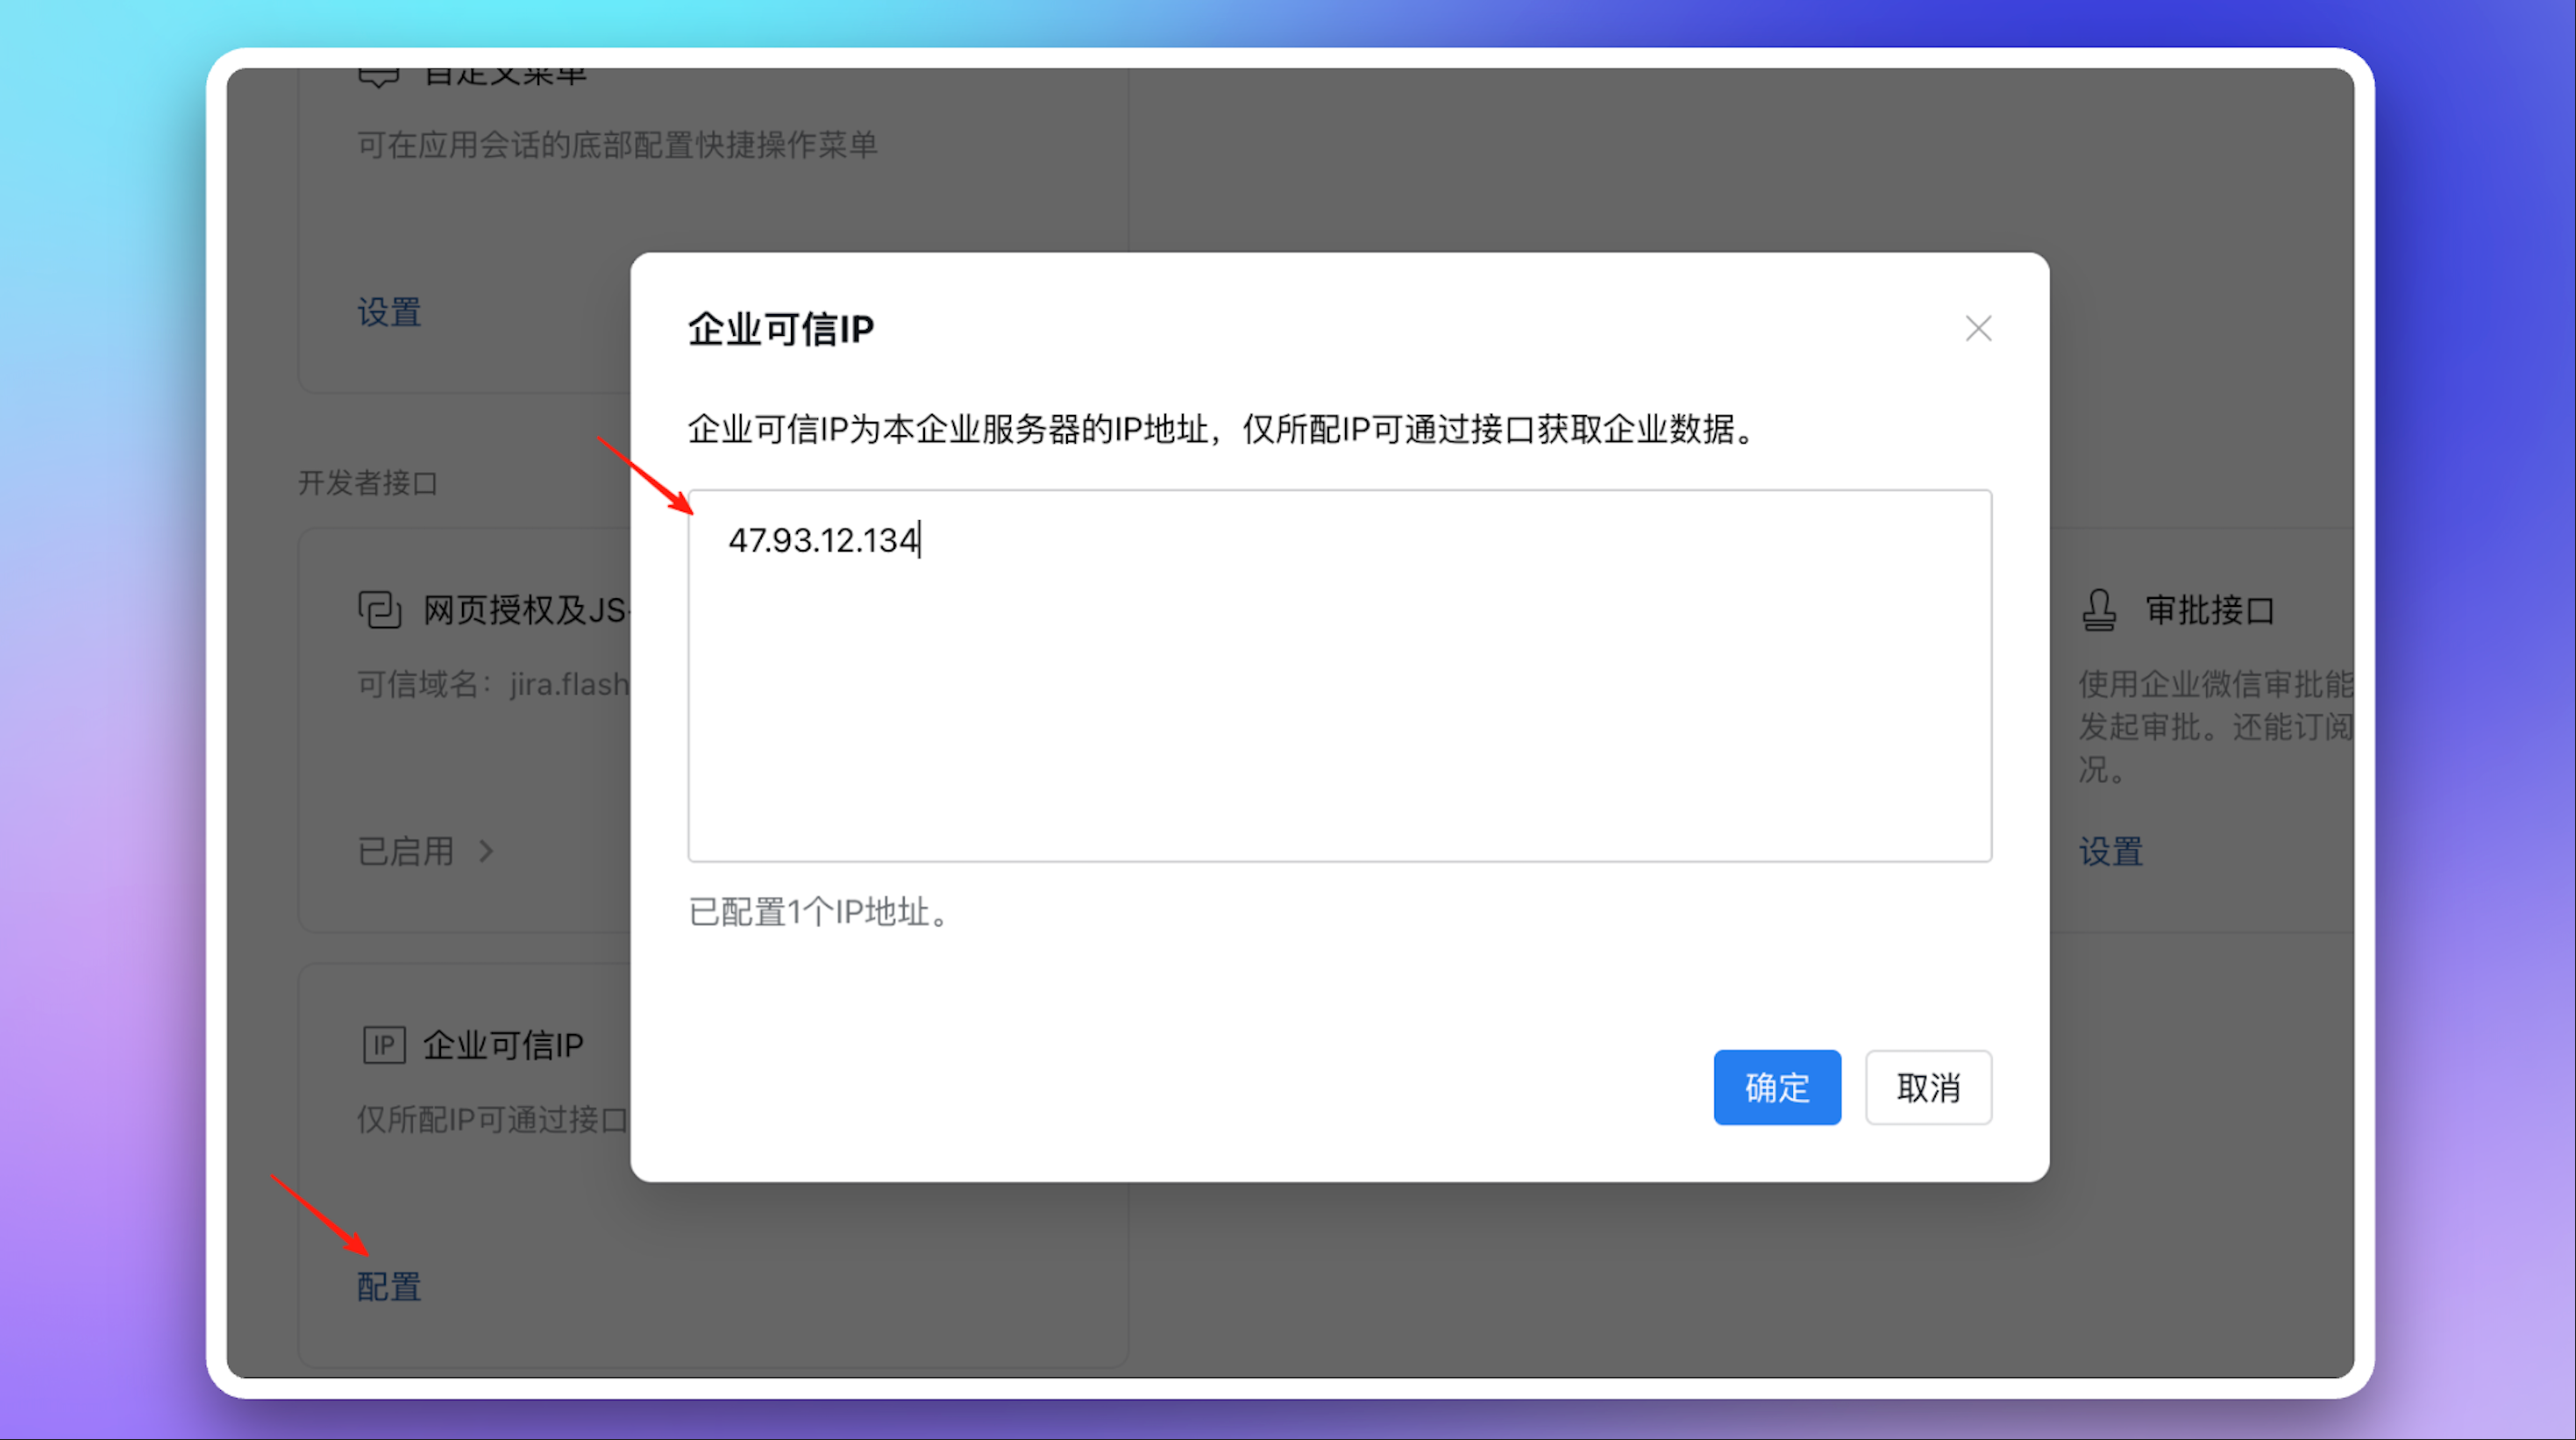
11. Configure **Trusted IP Address**: `47.93.12.134`
## 3. Configure War Room
War Room functionality is only supported in **Custom App Integration** mode.
After completing previous steps, in the Flashduty On-call integration configuration page's **Enhanced Features** section, check **Enable War Room** to activate this feature—no additional configuration needed.
Only one IM integration can have War Room enabled at a time. If you've already enabled War Room in another IM integration (such as Dingtalk, Feishu/Lark, or Slack), you need to disable it there first before enabling it in the current WeCom integration.
## 4. Configure AISRE
To use AISRE with WeCom, enable **War Room** for the Flashduty WeCom integration first. Then create an additional Smart Robot in WeCom and connect it to Flashduty in API mode.
1. In the WeCom app, open **Workspace** from the left sidebar, then go to Smart Robot management.
2. Create a new Smart Robot. Select **Manual creation**, then select **Create in API mode**.
Have an internal company member create the Smart Robot. Even if its visibility is set to **all internal members**, other members can only see the Smart Robot after the creator shares it.
3. On the Smart Robot's **API configuration** page, set the connection method to **Use URL callback**, and enter the `URL` provided on the Flashduty WeCom integration configuration page.
4. Generate the `Token` and `Encoding-AESKey` on the WeCom API configuration page, then enter the same values in the Flashduty WeCom integration configuration page. Make sure the `Token` and `Encoding-AESKey` are exactly the same in both WeCom and Flashduty, then save both configurations.
WeCom does not automatically add the Smart Robot to a War Room group after the War Room is created. To use AISRE in the War Room, manually add the Smart Robot to the corresponding group chat.
## 5. Linked Users
In the **Linked Users** tab of the integration detail page, you can view the linking status between team members and WeCom accounts, and quickly complete batch linking.
### View Linking Status
The linked users list shows all team members and their linking status. You can filter by:
| Filter | Description |
| :----------- | :------------------------------------------------------------- |
| **All** | View all team members |
| **Linked** | View only members who have linked their WeCom accounts |
| **Unlinked** | View only members who have not yet linked their WeCom accounts |
Search by name or email is supported.
### One-Click Linking
When unlinked members exist, click the **One-Click Link** button. The system will attempt to obtain WeCom account IDs via phone numbers or emails and automatically link them, equivalent to members logging into Flashduty using the same information on WeCom.
The system can only push WeCom message notifications after members complete linking. If linking fails, verify that the member's phone number or email matches their WeCom account.
## 6. WeCom Bot (AI SRE) Integration
The WeCom AI Bot (智能体) is WeCom's native AI conversation robot feature. By connecting Flashduty AI SRE to a WeCom Bot, your team can start AI incident investigation sessions directly from any WeCom single-chat or group-chat by @mentioning the bot—without leaving WeCom.
The bot integration uses **credentials that are entirely separate from the regular WeCom app** (Bot Token and Bot EncodingAESKey). Do not reuse the Token / EncodingAESKey you generated in [Custom App Integration](#self) step 8—the two sets of credentials are independent, and mixing them will cause signature verification failures.
AI SRE must be enabled for your account. If it is not, the WeCom Bot will return no response when it receives a message.
### Setup Steps
Visit the [WeCom Admin Console](https://work.weixin.qq.com/wework_admin/frame#apps), go to **App Management → AI Assistant**, click **Create AI Assistant** (Bot), and complete the basic information (name, avatar, visibility scope).
Open the details page of the bot you just created, go to the **Receive Messages** section, click **Random Generate** for both `Token` and `EncodingAESKey`, then copy and save both values.
These credentials belong exclusively to this bot and are **completely different** from the Token / EncodingAESKey configured in your WeCom custom app integration.
Return to the Flashduty On-call WeCom integration details page, find the **AI SRE Bot** configuration section, enter the `Bot Token` and `Bot EncodingAESKey` obtained above into the corresponding fields, and click **Save**.
After saving, the page displays the `integration_key` for this integration.
Copy the **Bot Callback URL** shown on the Flashduty integration details page. It has the format:
```
https:///event/push/wecom/bot?integration_key=
```
Return to the WeCom Admin Console, open the bot's **Receive Messages** settings, fill in the callback URL along with the Token and EncodingAESKey, then click **Save**.
WeCom sends a GET request to the callback URL for URL verification (echostr challenge). The Flashduty server automatically completes the verification response.
### How to Use
Once configured, **@mention your bot** in a WeCom single-chat or group-chat, type a question or incident description, and an AI SRE session starts. The bot supports these message types:
| Type | Description |
| :--------------- | :------------------------------------------------------------------------------ |
| **Text** | Ask a question or describe a problem directly |
| **Image** | Send a screenshot; AI will analyze the image content |
| **File** | Send a log or config file; AI will read and help investigate |
| **Quoted reply** | Quote a previous message to follow up; AI uses conversation history for context |
WeCom Bots use **pull-based streaming** (stream polling): while AI generates a reply, the WeCom client periodically sends `msgtype=stream` requests to the callback URL to fetch the latest content until the AI response is complete. This is a platform-level mechanism; no extra configuration is needed on your end.
### Troubleshooting
Check in order:
1. Confirm that AI SRE is enabled for your account.
2. Confirm the `integration_key` in the callback URL exactly matches the value shown on the Flashduty integration details page.
3. Confirm that the `Bot Token` and `Bot EncodingAESKey` saved in Flashduty match the values on the bot's **Receive Messages** page in WeCom Admin Console—not the values from your WeCom custom app.
4. Check the callback logs in the WeCom Admin Console to see whether requests are reaching the endpoint and whether any error codes are returned.
* Confirm that the Flashduty server is publicly reachable by WeCom servers.
* Confirm that the `Token` and `EncodingAESKey` you entered in WeCom exactly match what is saved in the Flashduty integration configuration.
* Confirm that the `integration_key` parameter in the callback URL is correct and that the corresponding integration is enabled.
This typically means the Bot Token or Bot EncodingAESKey is incorrect. The bot's Token / EncodingAESKey and the WeCom custom app's Token / EncodingAESKey are **two independent sets of credentials**. Regenerate them on the bot's **Receive Messages** page in WeCom Admin Console and update both values in the Flashduty integration configuration.
## 7. FAQ
* Please check if you've completed the app installation steps. For example, can you see the Flashduty On-call app in WeCom Workspace
* Please check if you've correctly configured `Corp ID`
1. Login to WeCom client (desktop or mobile), go to **Workspace**, find and open the Flashduty app
2. First entry requires login. Select your member account, after successful login via password or SSO, Flashduty account and WeCom account will be linked
3. Subsequent app access will be automatically passwordless
1. Before sending notifications, account linking must be completed as described in the previous question
2. Go to the specified channel, navigate to `Escalation Rules` → **Personal Channel**, select `WeCom` as notification method
3. Flashduty On-call supports customizing WeCom notification content. Go to **Template Management** page to set custom templates
Custom area can display up to 8 lines; excess will be truncated by WeCom.
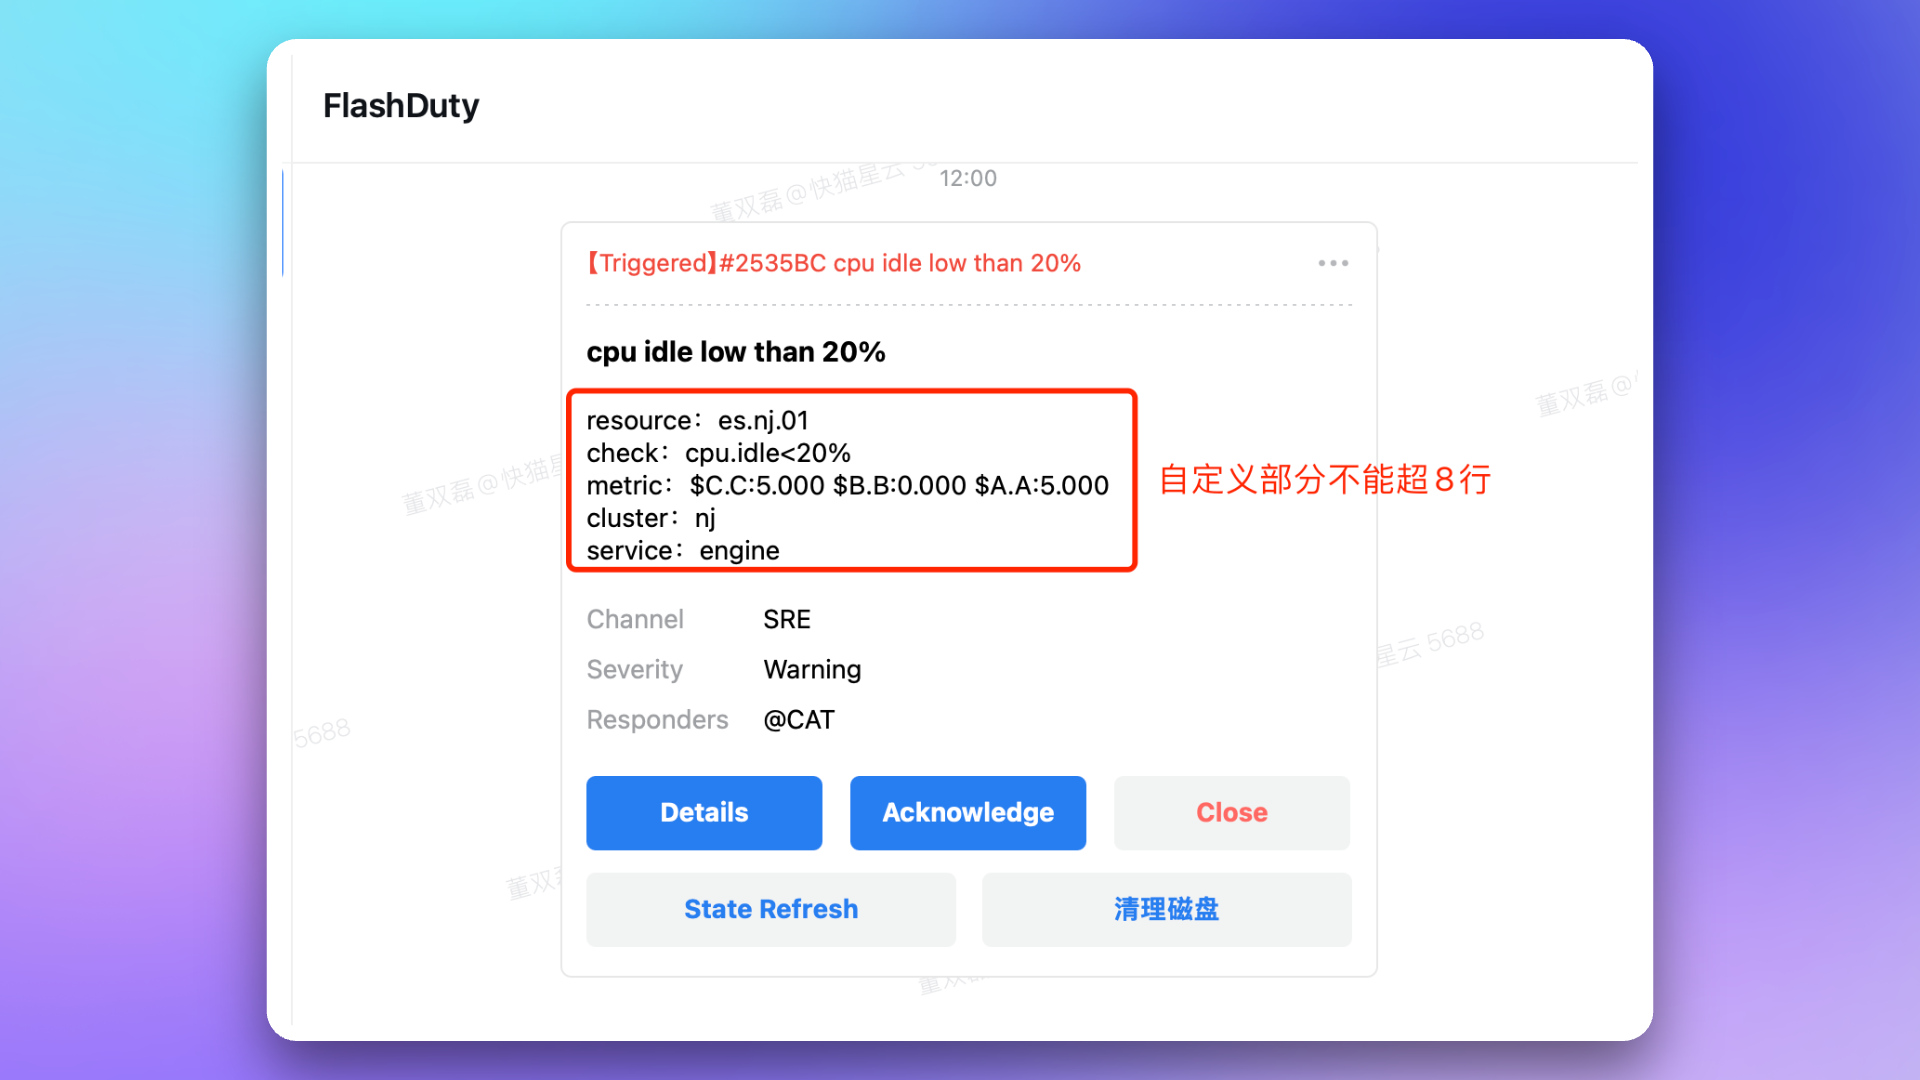
* Click card message to go directly to alert details page
* Click **Start Processing** to directly set alert to `Processing` status
* Click **Close Directly** to directly set alert to `Closed` status
* Click **Snooze 2 hours** to snooze the alert for 2 hours. For longer snooze times, click `...` in the card's top-right corner for more snooze options
Due to WeCom limitations, after one card interaction, it can only be updated once within 72 hours. Each button operation counts as one interaction.
When alert status changes, Flashduty On-call requests to update card content. When alert status changes frequently, cards may not update in real-time due to exceeding update limits. You can click the **Refresh** button to manually get one card status update opportunity.
Mac desktop defaults to opening links with WeCom's built-in browser. Try using shortcut `ctrl` + `command` + `shift` + `d` to enable debug mode, then select **Debug** → **Browser, WebView Related** → **Open Webpage with System Browser** to change link opening method. Use the same shortcut to disable debug mode; settings will be preserved.
Please contact Flashduty customer service or your dedicated technical support to purchase and enable the license.
See the **FAQ** section in [War Room documentation](/en/on-call/advanced/war-room).
Please confirm whether the domain in the `redirect_uri` parameter of the **App Homepage** URL has completed WeCom's required domain ownership verification. See WeCom official documentation [Enterprise Internal Development Domain Configuration Guide](https://open.work.weixin.qq.com/wwopen/common/readDocument/40754).