> ## Documentation Index
> Fetch the complete documentation index at: https://docs.flashcat.cloud/llms.txt
> Use this file to discover all available pages before exploring further.
# Application Management
> Learn how to create and manage RUM applications in Flashduty, including app creation, configuration, and permission management
## Overview
A RUM application is a container for frontend performance monitoring data, used to collect, store, and analyze real user experience data from frontend applications. An application represents a monitored frontend project, which can be a website, mobile app, or single-page application.
We recommend creating RUM applications based on business systems or applications, such as: official website, e-commerce store, admin dashboard, etc.
Each application has its own unique `applicationId` and `clientToken`, used to identify data sources and ensure data security. After the application is created, you need to integrate the SDK into your frontend code to start data collection and monitoring.
## Application Permissions
To meet the data security requirements of different business scenarios, RUM applications provide flexible access level settings:
| Access Level | Visibility | Applicable Scenarios |
| ------------ | -------------------------------------------------------------------- | ----------------------------- |
| **Public** | Visible to all users in the account, can view data and handle Issues | General business applications |
| **Private** | Only visible to creator, account administrator, and owner account | Sensitive business data |
In private applications, if other members need to view content, they can be temporarily authorized to access it by sharing the incident link.
## Create Application
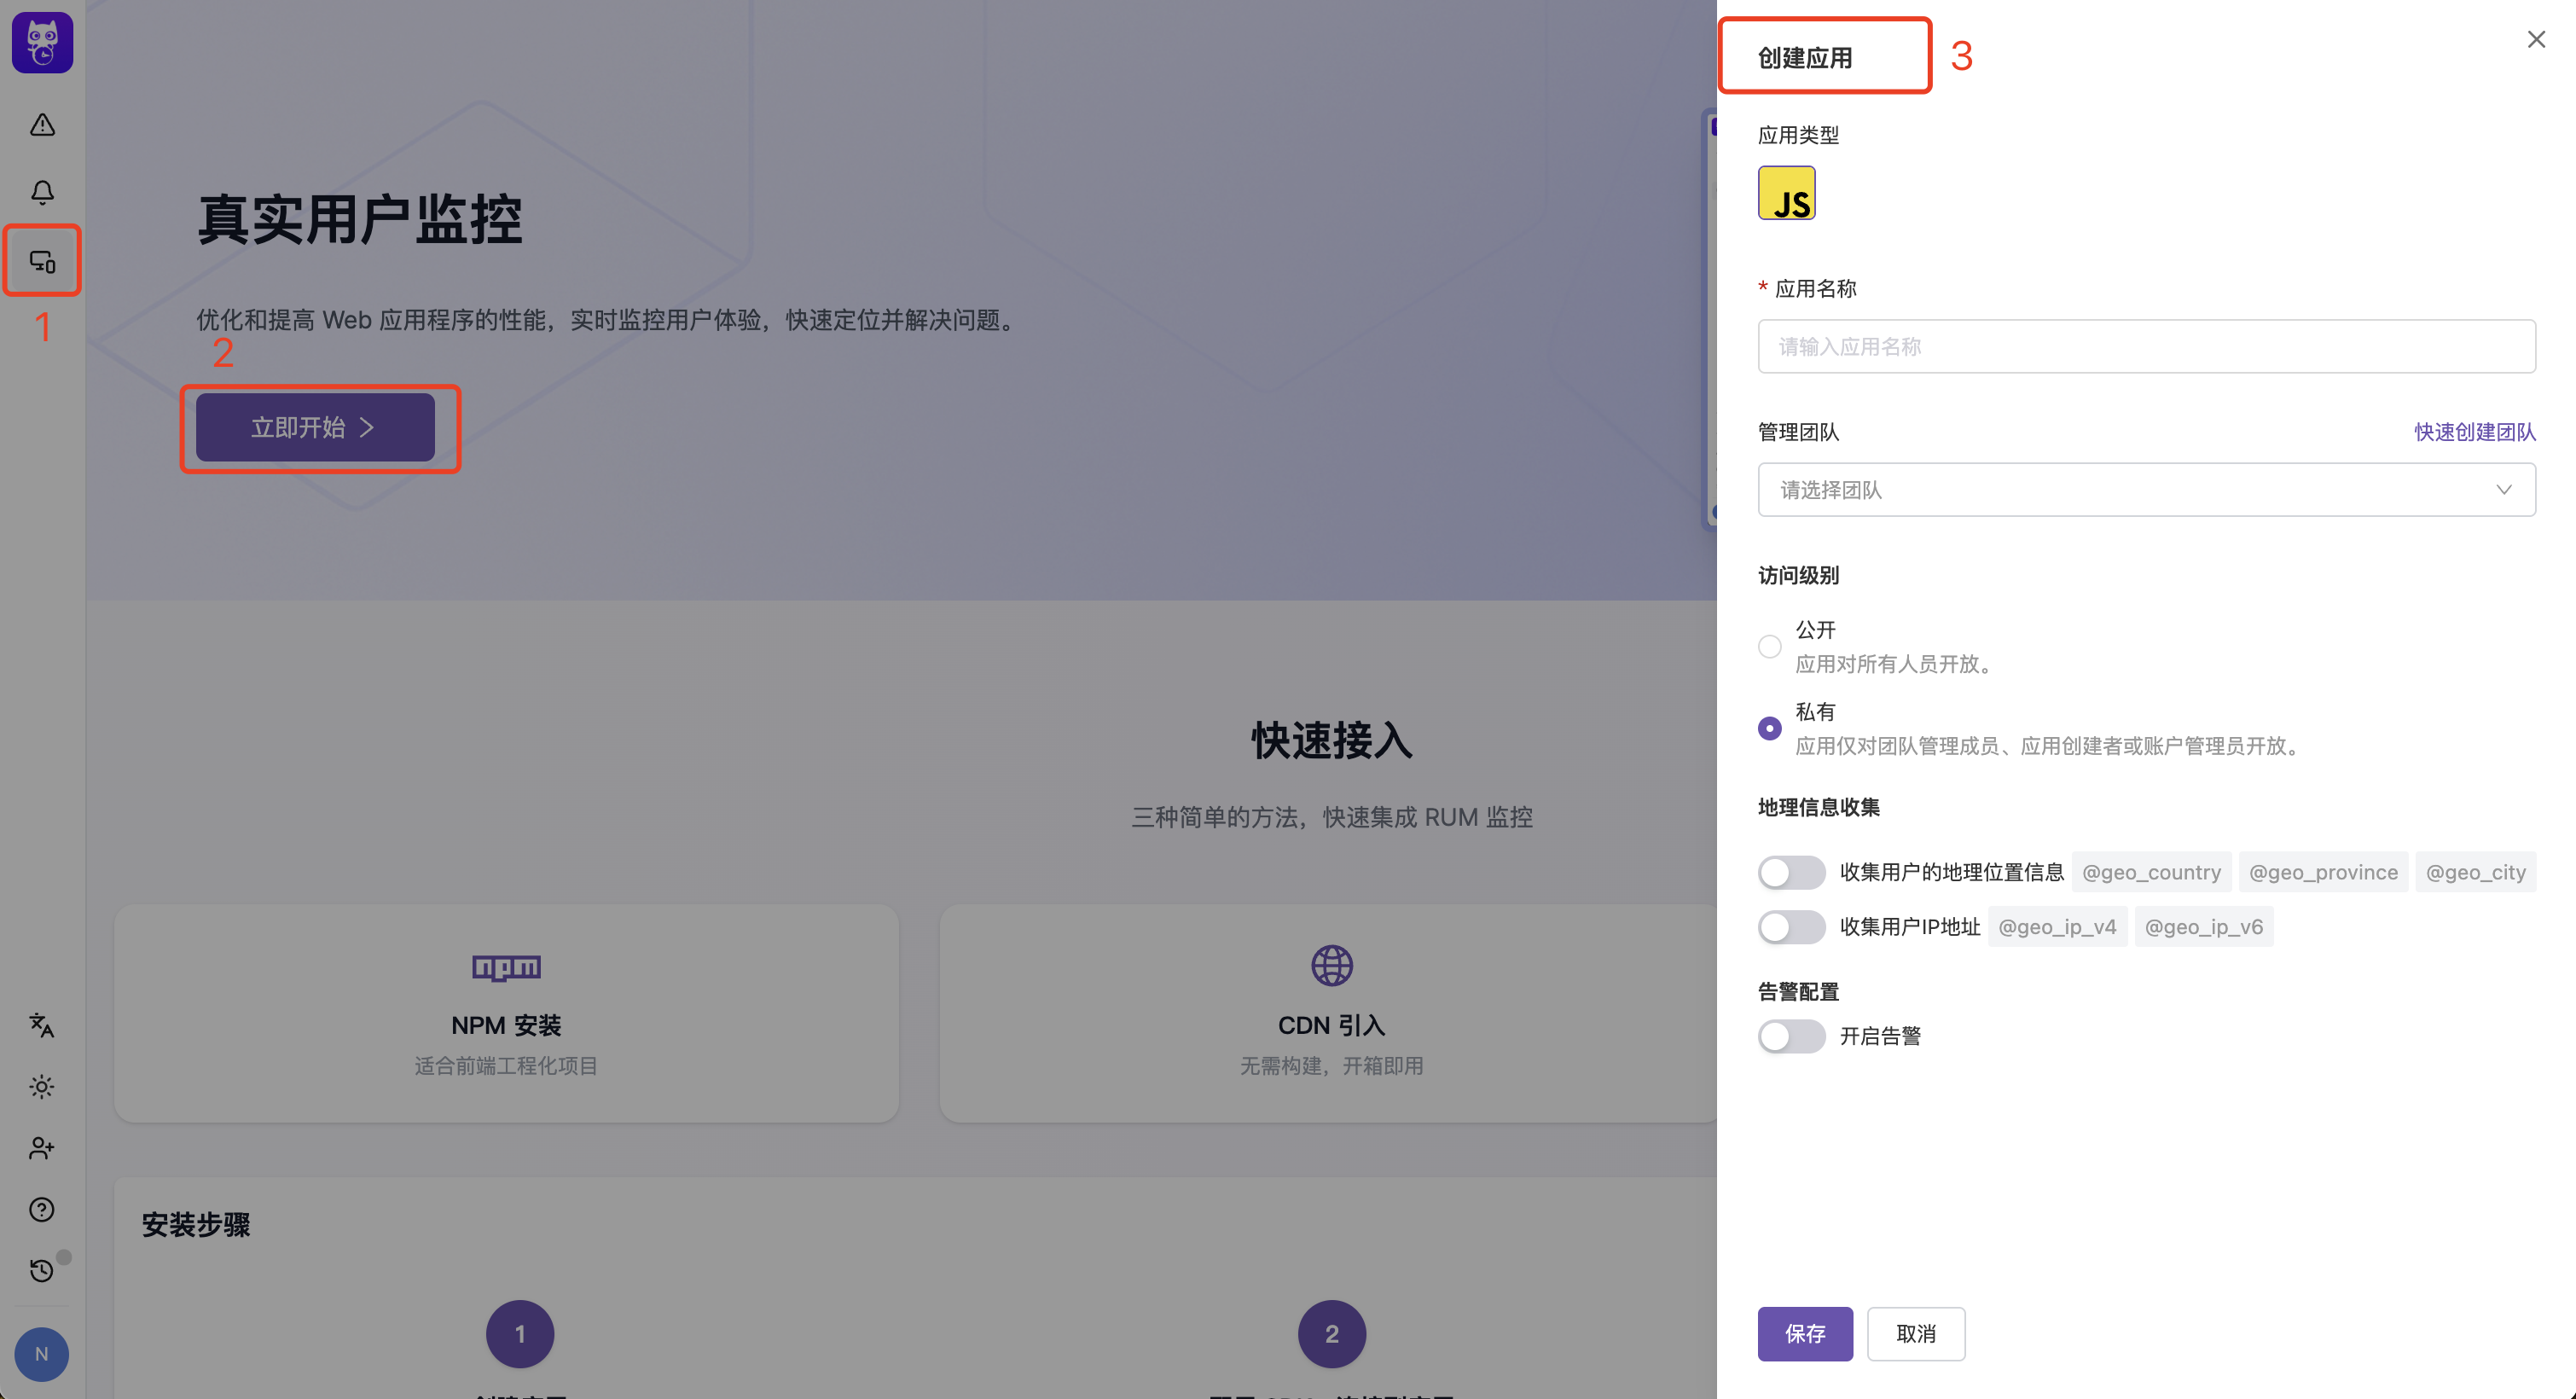 You can quickly create an application through the RUM product guide page:
Select the frontend technology type corresponding to the application, currently supporting **JavaScript (JS), Android, iOS, and WeChat Mini Program**.
Specify the management team for this application.
Team members have full operational permissions for this application, non-team members only have read-only access to the configuration of this application.
By default, automatic collection of user geo-location data is enabled. To disable automatic collection of client IP or geo-location data, turn off the geo-information collection switch.
See [Data Collection](/en/rum/others/data-collection).
By default, alert notifications are automatically enabled to facilitate timely handling of errors.
See [Issue Alerts](/en/rum/error-tracking/issue-alerts).
## SDK Configuration
You can modify parameters and preview the initialization code in real-time in **Application Configuration > SDK Configuration** to quickly integrate the SDK.
The console provides detailed integration guides for each platform:
* **JavaScript (Web)**: After configuring parameters like service name, preview the `flashcatRum.init()` initialization code in real-time
* **Android**: Shows complete integration steps including adding Gradle dependencies (`cloud.flashcat:dd-sdk-android-core` and `cloud.flashcat:dd-sdk-android-rum`), initializing the SDK in `Application.onCreate()` with RUM enabled, and optional WebView tracking integration
* **iOS**: Shows complete integration steps including adding Swift Package Manager dependency (`fc-sdk-ios`, from version 0.3.0), initializing the SDK in `AppDelegate.didFinishLaunchingWithOptions` with RUM enabled, and optional WebView tracking integration
* **WeChat Mini Program**: Fill in `env`, `service`, `version`, and `sessionSampleRate` in the form, and the `flashcatRum.init()` snippet built on `@flashcatcloud/miniprogram-rum` is generated and previewed in real time (see "WeChat Mini Program SDK Configuration Assistant" below)
Each platform's SDK configuration page automatically fills in the current application's `applicationId` and `clientToken`, so you can copy the code directly into your project.
Modifying SDK configuration in application management will not take effect in real-time on integrated clients. All configuration changes need to be updated in your frontend code and redeployed to take effect.
### Service Definition
A service is an independent, deployable code repository that maps to a set of pages.
If your application is built as a whole, your RUM application only needs one service name.
```javascript theme={null}
flashcatRum.init({
applicationId: 'YOUR_APP_ID',
clientToken: 'YOUR_CLIENT_TOKEN',
service: 'my-web-app' // Single service name
});
```
If your browser application is built from multiple independent repositories, set different service names for different modules.
```javascript theme={null}
// Main application
flashcatRum.init({
service: 'main-app'
});
// Sub-application A
flashcatRum.init({
service: 'module-a'
});
```
### WeChat Mini Program SDK Configuration Assistant
When the application type is **WeChat Mini Program**, **Application Configuration > SDK Configuration** displays a dedicated Mini Program integration wizard: fill in the form on the left and a ready-to-copy initialization snippet is generated on the right in real time.
#### Form Fields
| Field | Description | Validation | Default |
| ------------------- | ---------------------------------------------------- | ------------------------------------------------ | ------- |
| `env` | Environment variable, e.g. `prod`, `dev` | Letters, digits, underscore only; up to 24 chars | — |
| `service` | Service name; all events default to this tag | Letters, digits, underscore only; up to 24 chars | — |
| `version` | Version number, useful for filtering during analysis | Letters, digits, `.` only; up to 24 chars | `1.0.0` |
| `sessionSampleRate` | Session sample rate (percentage) | Integer in range `0–100` | `10` |
No save action is needed — the preview snippet updates as you type. `applicationId` and `clientToken` are filled in automatically by the system; you do not need to set them by hand.
#### Two-Step Integration
Install the SDK in your Mini Program project and run the npm build through WeChat DevTools:
```bash theme={null}
npm install @flashcatcloud/miniprogram-rum
```
Use the copy button at the top-right of the right-hand code block, then paste the generated snippet into your Mini Program's `app.js`:
```typescript theme={null}
import { flashcatRum } from '@flashcatcloud/miniprogram-rum';
flashcatRum.init({
applicationId: "",
clientToken: "",
service: "",
env: "",
version: "1.0.0",
sessionSampleRate: 10
});
```
For the full SDK capabilities, collection toggles, and event reporting model, see [WeChat Mini Program SDK Integration](/en/rum/sdk/wechat-miniprogram/sdk-integration).
## Link Integration
Link Integration lets you associate RUM events with external systems, such as distributed tracing platforms, log search, object storage that stores crash log packages, or internal troubleshooting systems. After you configure links, RUM generates jump links from the event type and event context and shows them as **Related Links** in event details.
Link Integration is available from the **Link Integration** tab on the application details page and applies to every application type. Members with the **RUM Application Update** permission can add, edit, enable, disable, or delete link configurations.
### Built-in Tracing
The built-in Tracing card is the default Link Integration entry. It links the `trace_id` on resource events to your backend tracing system.
In the **Link Integration** tab, find the **Tracing** card and enter the jump link for your tracing system. You can use the `${trace_id}` variable in the link. RUM replaces it with the actual Trace ID from the resource event when it displays the link.
For example: `https://your-tracing-system.com/trace/${trace_id}`
After you save the jump link, turn on the **Tracing** switch. The switch cannot be enabled until a jump link is configured.
Built-in Tracing only matches resource events, and it appears only when the event contains `trace_id`. The jump link must start with `http://` or `https://`.
### Add External Links
Besides built-in Tracing, you can add custom external links for different event types.
In the **Link Integration** tab, select **Add external link**, then enter the link name and redirect URL template.
Choose the event types where this link should appear. The supported types are **Crash, Error, View, Action, Resource, and Session**.
A crash is an error event: selecting **Error** matches both regular errors and crashes, while selecting **Crash** matches only crash events.
Insert variables in the **Redirect URL template**, such as `${session_id}`, `${error_id}`, or `${trace_id}`. The page previews the final URL with sample values so you can verify that the template matches your external system's query format.
| Setting | Description | Rule |
| ---------------------- | --------------------------------------------------------- | --------------------------------------- |
| Link name | External system name shown in RUM event details | Required |
| Applicable event types | Controls which RUM events show the link | Select at least one event type |
| Redirect URL template | External system URL that can include `${variable}` tokens | Must start with `http://` or `https://` |
| Per-link switch | Controls whether this external link is active | Disabled links are not shown |
### Available Variables
Link Integration extracts variables from the current event context and substitutes them into the URL template.
| Variable | Description | Common Event Scope |
| ------------------- | -------------------------------------------- | -------------------------------------- |
| `${session_id}` | Session ID | Session, View, Action, Error, Resource |
| `${view_id}` | View ID | View, Action, Error, Resource |
| `${action_id}` | Action ID | Action |
| `${error_id}` | Error ID | Error, Crash |
| `${resource_id}` | Resource ID | Resource |
| `${trace_id}` | Trace ID | Resource, built-in Tracing |
| `${application_id}` | RUM application ID | All events |
| `${service}` | Service name | Events that collect `service` |
| `${version}` | Version | Events that collect `version` |
| `${env}` | Environment | Events that collect `env` |
| `${usr_id}` | User ID | Events that collect user information |
| `${usr_name}` | User name | Events that collect user information |
| `${usr_email}` | User email | Events that collect user information |
| `${start_time}` | Start time of the current event detail query | Explorer event details |
| `${end_time}` | End time of the current event detail query | Explorer event details |
Put optional variables in query parameters, for example `https://logs.example.com/search?session=${session_id}&error=${error_id}`. If a query parameter only contains a missing variable, RUM omits that parameter when generating the link. Missing variables in the URL path stay as the original `${variable}` text.
### View Related Links
When an event matches an enabled link configuration, you can open the external system from these locations:
* **RUM Explorer event details**: the **Related Links** dropdown appears in the top-right corner for event details such as Session, View, Action, Error, and Resource
* **Error event details**: matching related links appear as embedded cards in the details area, with copy and open actions
* **Issue error samples**: matching related links appear below the error sample, so you can jump from an Issue directly to logs, tracing, or another troubleshooting system
## Privacy Settings
Privacy settings allow you to control the scope of user privacy data collected by the RUM SDK, meeting data compliance requirements for different regions.
| Setting | Description | Associated Fields |
| ---------------------------- | ------------------------------------------------------------------------------------------ | -------------------------------------------- |
| **Geo-location Information** | Controls whether to collect user country, province, city, and other geographic information | `@geo_country`, `@geo_province`, `@geo_city` |
| **IP Address** | Controls whether to collect user IPv4 and IPv6 addresses | `@geo_ip_v4`, `@geo_ip_v6` |
After disabling geo-location or IP address collection, the related filter and analysis dimensions will no longer be available. Please adjust carefully based on your business requirements and compliance needs.
## Delete Application
If you no longer need an application, you can find the delete button at the bottom of the "Basic Info" tab in the application details.
After deleting an application:
* No new events will be received
* The application's Client Token will be immediately revoked
* Previously collected RUM event data can still be manually exported, or you can contact the support team to restore the deleted application
This operation requires the **RUM Application Delete** permission.
## Next Steps
Learn how to integrate RUM SDK
Learn about advanced configuration options for the SDK
View and analyze RUM data
Learn how to integrate the RUM SDK into a WeChat Mini Program
You can quickly create an application through the RUM product guide page:
Select the frontend technology type corresponding to the application, currently supporting **JavaScript (JS), Android, iOS, and WeChat Mini Program**.
Specify the management team for this application.
Team members have full operational permissions for this application, non-team members only have read-only access to the configuration of this application.
By default, automatic collection of user geo-location data is enabled. To disable automatic collection of client IP or geo-location data, turn off the geo-information collection switch.
See [Data Collection](/en/rum/others/data-collection).
By default, alert notifications are automatically enabled to facilitate timely handling of errors.
See [Issue Alerts](/en/rum/error-tracking/issue-alerts).
## SDK Configuration
You can modify parameters and preview the initialization code in real-time in **Application Configuration > SDK Configuration** to quickly integrate the SDK.
The console provides detailed integration guides for each platform:
* **JavaScript (Web)**: After configuring parameters like service name, preview the `flashcatRum.init()` initialization code in real-time
* **Android**: Shows complete integration steps including adding Gradle dependencies (`cloud.flashcat:dd-sdk-android-core` and `cloud.flashcat:dd-sdk-android-rum`), initializing the SDK in `Application.onCreate()` with RUM enabled, and optional WebView tracking integration
* **iOS**: Shows complete integration steps including adding Swift Package Manager dependency (`fc-sdk-ios`, from version 0.3.0), initializing the SDK in `AppDelegate.didFinishLaunchingWithOptions` with RUM enabled, and optional WebView tracking integration
* **WeChat Mini Program**: Fill in `env`, `service`, `version`, and `sessionSampleRate` in the form, and the `flashcatRum.init()` snippet built on `@flashcatcloud/miniprogram-rum` is generated and previewed in real time (see "WeChat Mini Program SDK Configuration Assistant" below)
Each platform's SDK configuration page automatically fills in the current application's `applicationId` and `clientToken`, so you can copy the code directly into your project.
Modifying SDK configuration in application management will not take effect in real-time on integrated clients. All configuration changes need to be updated in your frontend code and redeployed to take effect.
### Service Definition
A service is an independent, deployable code repository that maps to a set of pages.
If your application is built as a whole, your RUM application only needs one service name.
```javascript theme={null}
flashcatRum.init({
applicationId: 'YOUR_APP_ID',
clientToken: 'YOUR_CLIENT_TOKEN',
service: 'my-web-app' // Single service name
});
```
If your browser application is built from multiple independent repositories, set different service names for different modules.
```javascript theme={null}
// Main application
flashcatRum.init({
service: 'main-app'
});
// Sub-application A
flashcatRum.init({
service: 'module-a'
});
```
### WeChat Mini Program SDK Configuration Assistant
When the application type is **WeChat Mini Program**, **Application Configuration > SDK Configuration** displays a dedicated Mini Program integration wizard: fill in the form on the left and a ready-to-copy initialization snippet is generated on the right in real time.
#### Form Fields
| Field | Description | Validation | Default |
| ------------------- | ---------------------------------------------------- | ------------------------------------------------ | ------- |
| `env` | Environment variable, e.g. `prod`, `dev` | Letters, digits, underscore only; up to 24 chars | — |
| `service` | Service name; all events default to this tag | Letters, digits, underscore only; up to 24 chars | — |
| `version` | Version number, useful for filtering during analysis | Letters, digits, `.` only; up to 24 chars | `1.0.0` |
| `sessionSampleRate` | Session sample rate (percentage) | Integer in range `0–100` | `10` |
No save action is needed — the preview snippet updates as you type. `applicationId` and `clientToken` are filled in automatically by the system; you do not need to set them by hand.
#### Two-Step Integration
Install the SDK in your Mini Program project and run the npm build through WeChat DevTools:
```bash theme={null}
npm install @flashcatcloud/miniprogram-rum
```
Use the copy button at the top-right of the right-hand code block, then paste the generated snippet into your Mini Program's `app.js`:
```typescript theme={null}
import { flashcatRum } from '@flashcatcloud/miniprogram-rum';
flashcatRum.init({
applicationId: "",
clientToken: "",
service: "",
env: "",
version: "1.0.0",
sessionSampleRate: 10
});
```
For the full SDK capabilities, collection toggles, and event reporting model, see [WeChat Mini Program SDK Integration](/en/rum/sdk/wechat-miniprogram/sdk-integration).
## Link Integration
Link Integration lets you associate RUM events with external systems, such as distributed tracing platforms, log search, object storage that stores crash log packages, or internal troubleshooting systems. After you configure links, RUM generates jump links from the event type and event context and shows them as **Related Links** in event details.
Link Integration is available from the **Link Integration** tab on the application details page and applies to every application type. Members with the **RUM Application Update** permission can add, edit, enable, disable, or delete link configurations.
### Built-in Tracing
The built-in Tracing card is the default Link Integration entry. It links the `trace_id` on resource events to your backend tracing system.
In the **Link Integration** tab, find the **Tracing** card and enter the jump link for your tracing system. You can use the `${trace_id}` variable in the link. RUM replaces it with the actual Trace ID from the resource event when it displays the link.
For example: `https://your-tracing-system.com/trace/${trace_id}`
After you save the jump link, turn on the **Tracing** switch. The switch cannot be enabled until a jump link is configured.
Built-in Tracing only matches resource events, and it appears only when the event contains `trace_id`. The jump link must start with `http://` or `https://`.
### Add External Links
Besides built-in Tracing, you can add custom external links for different event types.
In the **Link Integration** tab, select **Add external link**, then enter the link name and redirect URL template.
Choose the event types where this link should appear. The supported types are **Crash, Error, View, Action, Resource, and Session**.
A crash is an error event: selecting **Error** matches both regular errors and crashes, while selecting **Crash** matches only crash events.
Insert variables in the **Redirect URL template**, such as `${session_id}`, `${error_id}`, or `${trace_id}`. The page previews the final URL with sample values so you can verify that the template matches your external system's query format.
| Setting | Description | Rule |
| ---------------------- | --------------------------------------------------------- | --------------------------------------- |
| Link name | External system name shown in RUM event details | Required |
| Applicable event types | Controls which RUM events show the link | Select at least one event type |
| Redirect URL template | External system URL that can include `${variable}` tokens | Must start with `http://` or `https://` |
| Per-link switch | Controls whether this external link is active | Disabled links are not shown |
### Available Variables
Link Integration extracts variables from the current event context and substitutes them into the URL template.
| Variable | Description | Common Event Scope |
| ------------------- | -------------------------------------------- | -------------------------------------- |
| `${session_id}` | Session ID | Session, View, Action, Error, Resource |
| `${view_id}` | View ID | View, Action, Error, Resource |
| `${action_id}` | Action ID | Action |
| `${error_id}` | Error ID | Error, Crash |
| `${resource_id}` | Resource ID | Resource |
| `${trace_id}` | Trace ID | Resource, built-in Tracing |
| `${application_id}` | RUM application ID | All events |
| `${service}` | Service name | Events that collect `service` |
| `${version}` | Version | Events that collect `version` |
| `${env}` | Environment | Events that collect `env` |
| `${usr_id}` | User ID | Events that collect user information |
| `${usr_name}` | User name | Events that collect user information |
| `${usr_email}` | User email | Events that collect user information |
| `${start_time}` | Start time of the current event detail query | Explorer event details |
| `${end_time}` | End time of the current event detail query | Explorer event details |
Put optional variables in query parameters, for example `https://logs.example.com/search?session=${session_id}&error=${error_id}`. If a query parameter only contains a missing variable, RUM omits that parameter when generating the link. Missing variables in the URL path stay as the original `${variable}` text.
### View Related Links
When an event matches an enabled link configuration, you can open the external system from these locations:
* **RUM Explorer event details**: the **Related Links** dropdown appears in the top-right corner for event details such as Session, View, Action, Error, and Resource
* **Error event details**: matching related links appear as embedded cards in the details area, with copy and open actions
* **Issue error samples**: matching related links appear below the error sample, so you can jump from an Issue directly to logs, tracing, or another troubleshooting system
## Privacy Settings
Privacy settings allow you to control the scope of user privacy data collected by the RUM SDK, meeting data compliance requirements for different regions.
| Setting | Description | Associated Fields |
| ---------------------------- | ------------------------------------------------------------------------------------------ | -------------------------------------------- |
| **Geo-location Information** | Controls whether to collect user country, province, city, and other geographic information | `@geo_country`, `@geo_province`, `@geo_city` |
| **IP Address** | Controls whether to collect user IPv4 and IPv6 addresses | `@geo_ip_v4`, `@geo_ip_v6` |
After disabling geo-location or IP address collection, the related filter and analysis dimensions will no longer be available. Please adjust carefully based on your business requirements and compliance needs.
## Delete Application
If you no longer need an application, you can find the delete button at the bottom of the "Basic Info" tab in the application details.
After deleting an application:
* No new events will be received
* The application's Client Token will be immediately revoked
* Previously collected RUM event data can still be manually exported, or you can contact the support team to restore the deleted application
This operation requires the **RUM Application Delete** permission.
## Next Steps
Learn how to integrate RUM SDK
Learn about advanced configuration options for the SDK
View and analyze RUM data
Learn how to integrate the RUM SDK into a WeChat Mini Program