Cloud Version
In ServiceDesk Plus
Step 1: Create Authorization Application
Select the corresponding Developer Console address based on your ServiceDesk Plus service region: Data Centres-
Login to Developer Console, select
Self Clienttype Client and create. -
Click
Generate Code, enter inScope: SDPOnDemand.requests.ALL,SDPOnDemand.setup.READ,SDPOnDemand.custommodule.READ. Refer to official documentation for scope reference. -
Select the maximum 10 minutes for
Time Duration, enter any description inScope Descriptionlike: Used for Flashduty sync, and create. - Copy the generated Code, Client ID, and Client Secret for later use.


Note: The Code is only valid for 10 minutes and can only be used once. After obtaining the Code, please complete Integration Authorization within the validity period.
In Flashduty On-call
Step 2: Integration Authorization
Select the corresponding API Endpoint and Accounts Server URL based on your ServiceDesk Plus service region: Data Centres- Select Cloud Version for
Platform Type, enterAPI EndpointandAccounts Server URL. - Enter the
Code,Client ID, andClient Secretgenerated in the Create Authorization Application step and click Next to complete Integration Configuration (if errors occur, regenerate the Code or contact technical support).
Private Deployment Version
In ServiceDesk Plus
Step 1: Generate API Key
- Login to ServiceDesk Plus console, click
Generate API Keyin Personal Center. - Select Never Expire for
Token Expiration, copy the generated Token for later use, and complete Integration Authorization.
Note: The user generating the API key needs relevant permissions such as create/update requests, get template/priority/custom field lists. Insufficient permissions will prevent completing integration configuration—we recommend using an admin role.
In Flashduty On-call
Step 2: Integration Authorization
- Select Private Deployment Version for
Platform Type, enterAPI Endpoint. - Enter the generated Token and click Next to complete Integration Configuration.
Common Configuration
In Flashduty On-call
Step 1: Integration Configuration
- Integration Name: Define a name for the current integration.
- Management Team: When a management team is selected, only team members and tenant administrators can edit this integration.
-
Sync Direction:
- To_ServiceDesk_Plus: Sync Flashduty incidents to ServiceDesk Plus.
- From_ServiceDesk_Plus: Sync ServiceDesk Plus requests to Flashduty.
- Two-way: Flashduty and ServiceDesk Plus sync mutually.
-
Trigger Mode:
- Auto Trigger: Configure conditions; Flashduty On-call will automatically sync incidents matching the conditions to ServiceDesk Plus.
- Manual Trigger: Manually trigger ServiceDesk Plus sync from More Actions in incident details (the integration configuration name is the trigger name).
- Channel: Select channels where this integration takes effect.
- Request Template: Select the template to use when creating requests; if empty, tickets are created using the default template.
- Severity Mapping: Choose to map severity, incident labels, or custom field values to ServiceDesk Plus priority field; if empty, the field is not passed when creating tickets.
-
Custom Field Mapping: Map labels or custom fields from incidents to corresponding text fields in ServiceDesk Plus tickets for automatic information filling. This feature supports syncing common context information (like service name, instance address, metric name) to ServiceDesk Plus for subsequent investigation and tracking.
- Only supports target fields of single-line or multi-line text type.
- Supports extracting values from incident labels (like service, instance) or custom properties.
- If source field is empty, target field remains empty and won’t overwrite existing content.
- Assignee Mapping: When Flashduty incidents sync to ServiceDesk Plus and need auto-assignment to Technician or Group, use Flashduty incident label values as assignees (if corresponding assignee doesn’t exist, sync will fail—choose carefully).
- Requester: Specify the requester when creating tickets; must be configured if this field is required during creation.
-
Click
Saveto complete configuration.
In ServiceDesk Plus
Step 2: Configure Sync
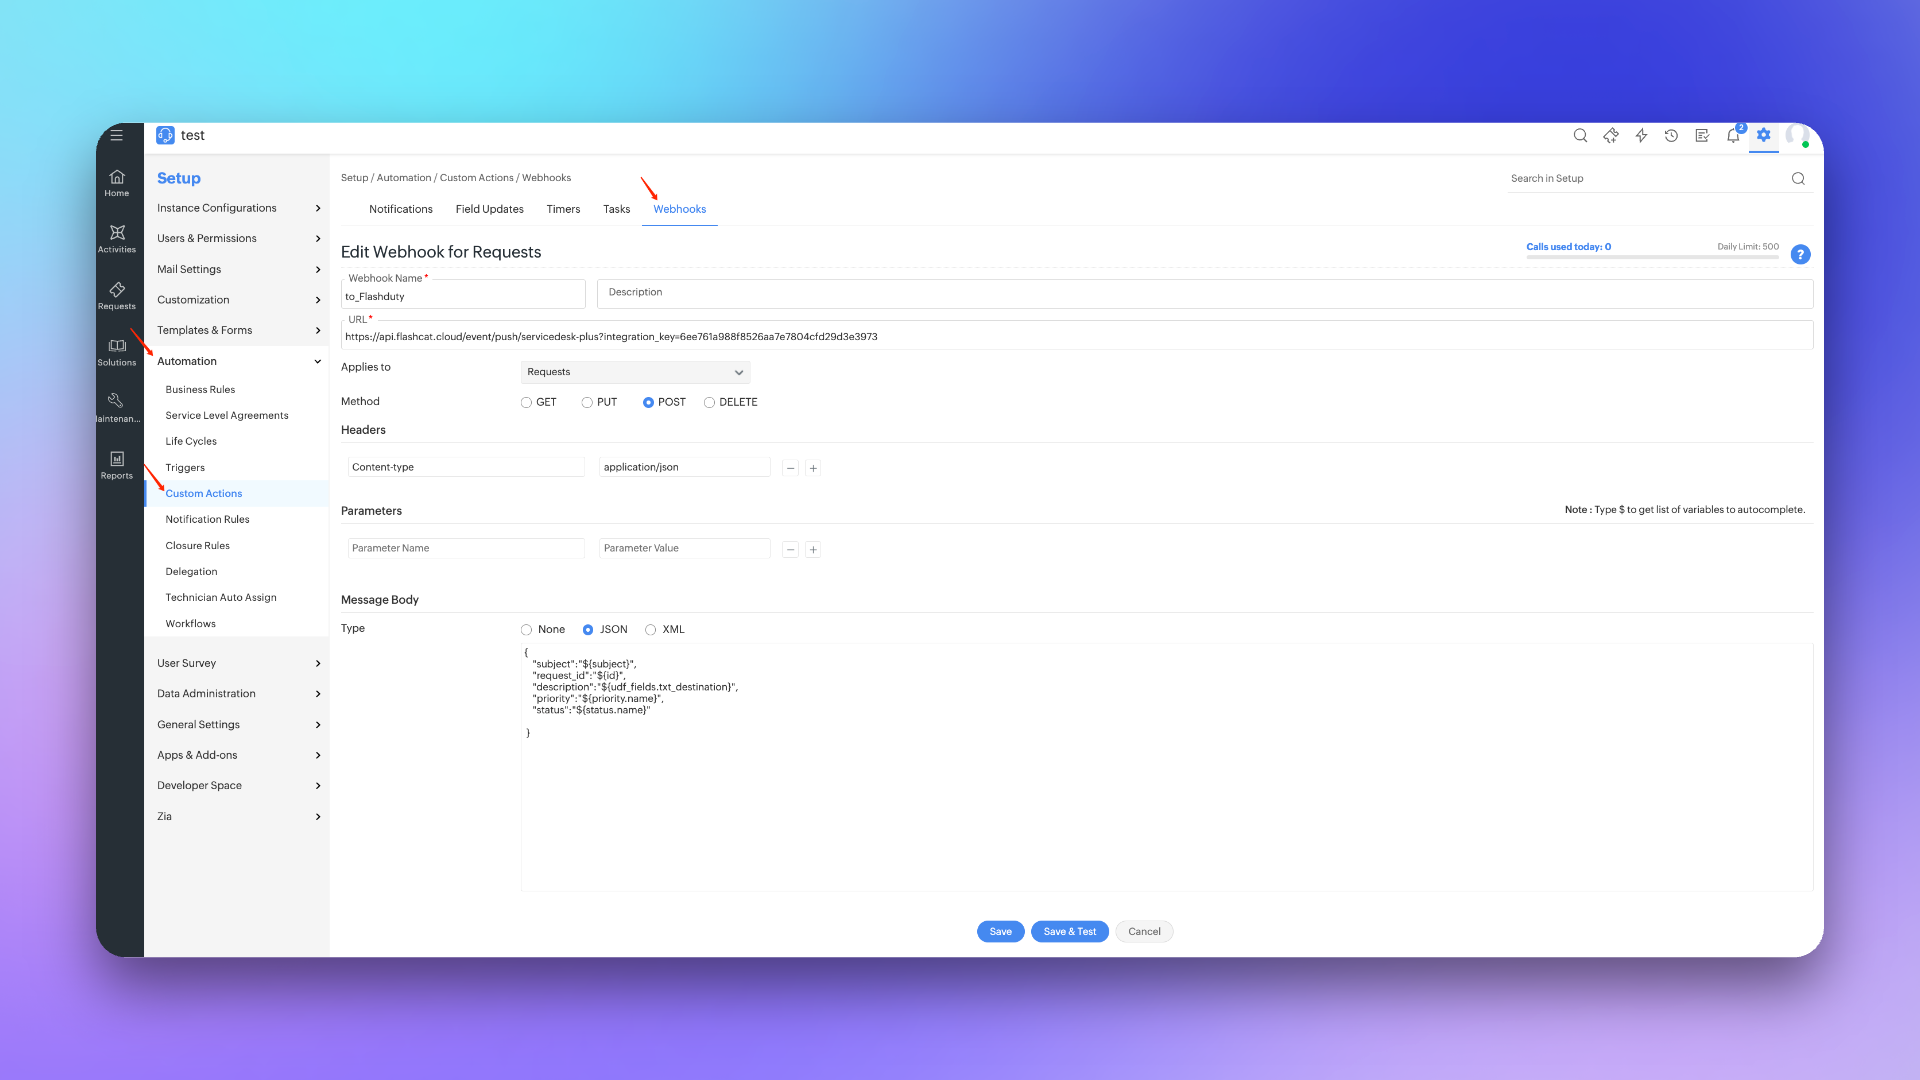
To sync ServiceDesk Plus requests to Flashduty, refer to this configuration item. Note: Paths may differ slightly between versions, but configuration methods are the same.Create Webhook
- Login to ServiceDesk Plus console, find the
Setupconfiguration page. - Select
Automation, then go toCustom Actionspage and selectWebhooks. - Click
New Webhook, enter to_Flashduty forWebhook Name. - Enter the integration’s push URL for
URL. - Select Requests for
Applies to, POST forMethod, enter Content-Type application/json inHeaders. - Select JSON for
Message BodyType and enter the following:
- Click
Saveto complete configuration.
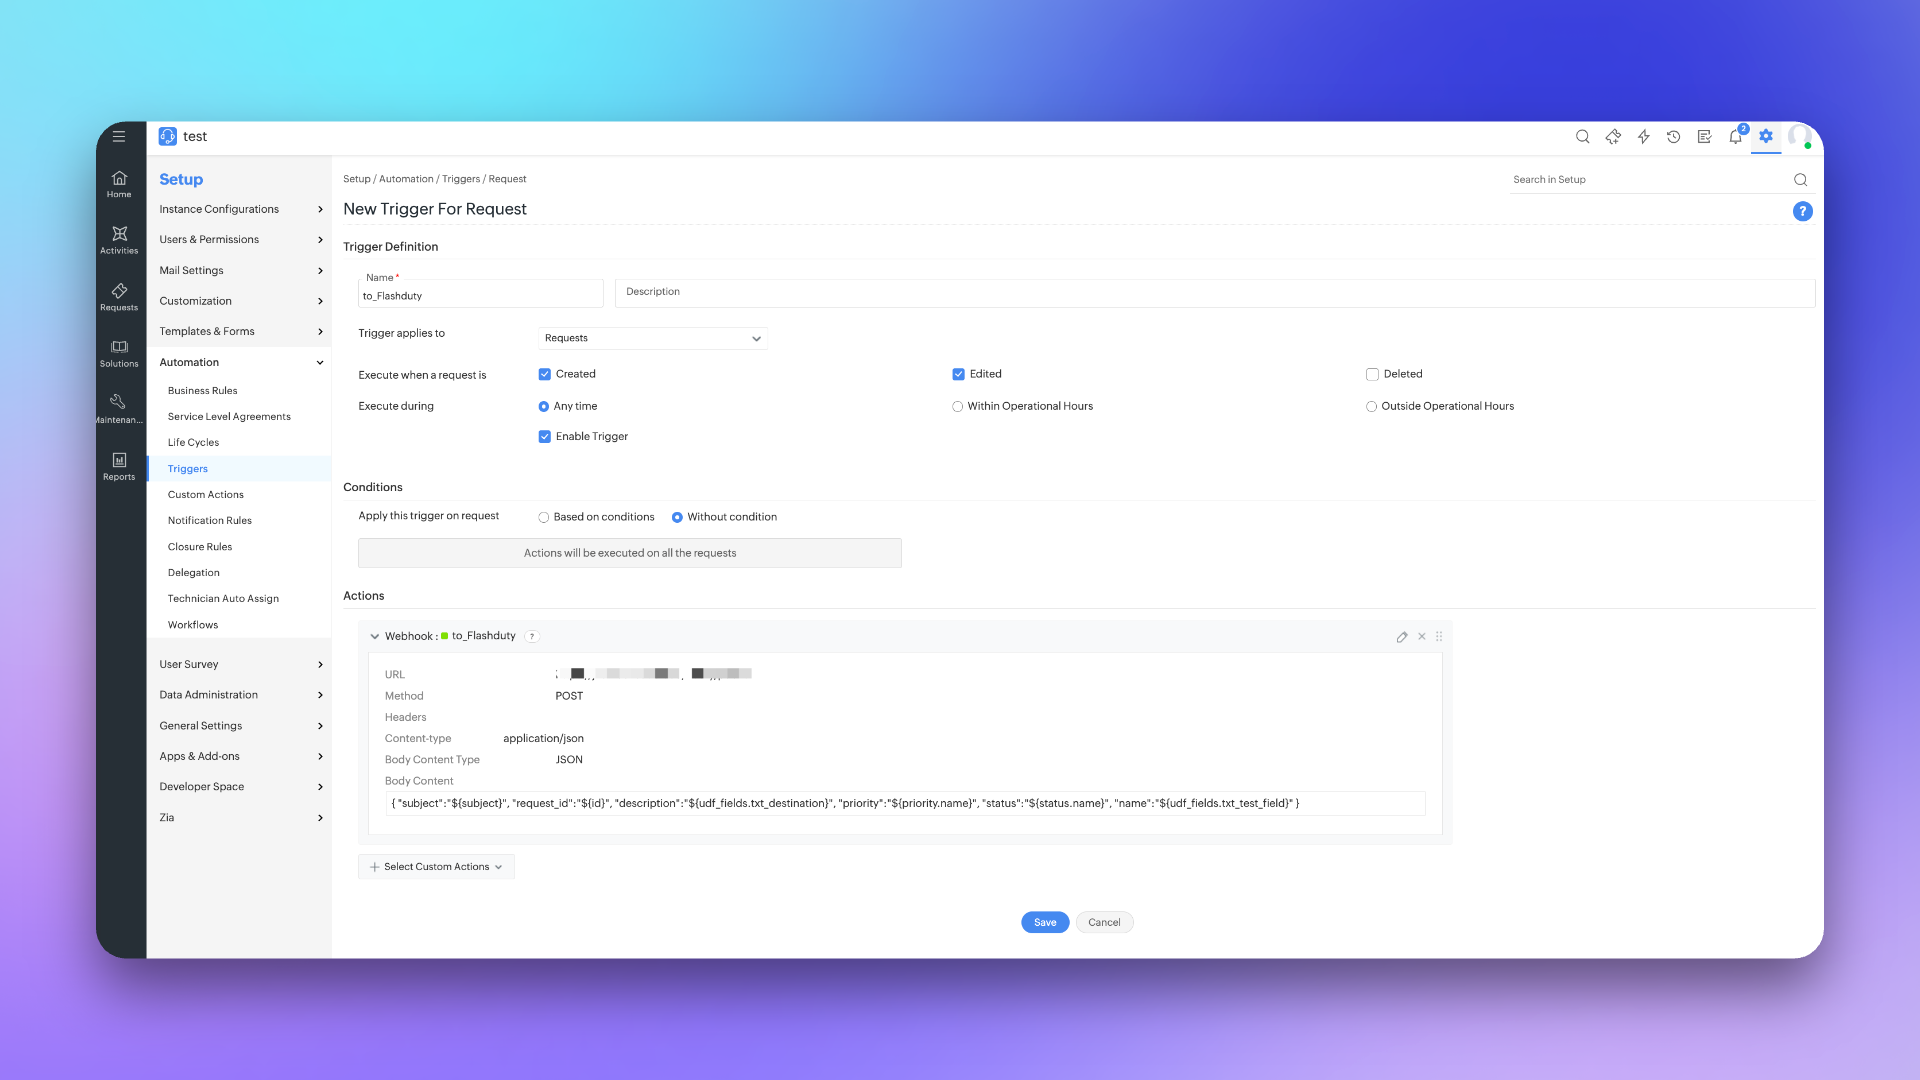
Step 3: Create Trigger
- Login to ServiceDesk Plus console, find the
Setupconfiguration page. - Select
Automation, then go toTriggerspage and selectRequest. - Click
New Trigger, enter to_Flashduty forName. - Select Request for
Trigger applies to, check Create and Edited forExecute when a request is. - Select Any time for
Execute duringand check Enable Trigger. - Select
Without conditionforConditionsor configure as needed. - In
Actions, select Webhook and check to_Flashduty channel. - Click
Saveto complete configuration.
Sync Information Mapping
Form Fields
| ServiceDesk Plus | Flashduty | Notes |
|---|---|---|
| Subject | Title | Title |
| Description | Description | Description |
| Status | Progress | Status |
| Priority | Severity | Severity |
| Others | Custom Fields | Custom fields |
Status Mapping
| ServiceDesk Plus | Flashduty | Notes |
|---|---|---|
| Open | Triggered | Triggered |
| In Progress | Processing | Processing |
| Assigned | Processing | Processing |
| Pending Verification | Processing | Processing |
| Staging | Processing | Processing |
| On Hold | Snoozed | Default snooze 2 hours |
| Resolved | Closed | Closed |
| Closed | Closed | Closed |
| Canceled | Closed | Closed |
| Rejected | Closed | Closed |
Invocation History
The ServiceDesk Plus Sync integration provides a complete invocation history, helping you troubleshoot sync delivery and debug interface issues.View Invocation History
Go to the ServiceDesk Plus Sync integration detail page and switch to the Invocation History tab.Filtering and Search
| Filter | Description |
|---|---|
| Time Range | Select from last 30 minutes, 6 hours, 1 day, 2 days, 7 days, 14 days, 30 days, or custom range |
| Incident ID | Enter an incident ID for exact search |
| Channel | Filter records by channel |
| Request Status | Filter by success or failure |
History Record Fields
| Field | Description |
|---|---|
| Trigger Time | Time when the event was triggered |
| Incident Title | Associated incident title; click to jump to incident details |
| Request ID | ServiceDesk Plus request ID; click to jump to ServiceDesk Plus to view the request |
| Channel | Associated channel; click to navigate |
| Request Status | Success or failure |
View Invocation Details
Click View Details on a record to see the complete request information:- Incident ID: Associated incident ID
- Channel: Associated channel
- Incident Title: Click to jump to the incident detail page
- Trigger Time: Time the request was triggered
- Request Status: Success or failure
- Error Message: Displays error information on failure